Stackfield 4 – the update everyone was waiting for!
The waiting is over - 'we just released a brand new version of Stackfield '! And this is not just any version. It is one of the most extensive updates in the history of Stackfield. Today we will introduce its new features.
The new design
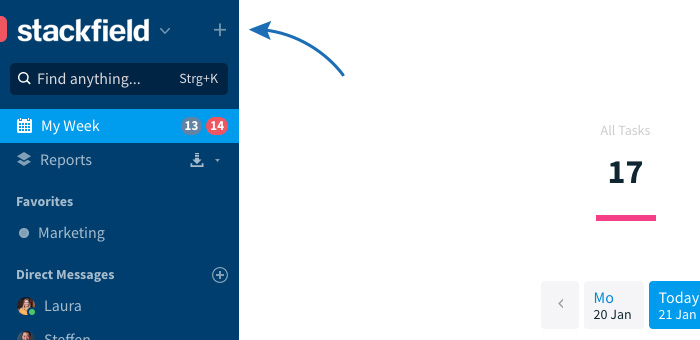
Let's start right away with the innovation, which is probably the first thing that catches your eye. Our new design – clear, modern and concice. In addition to a few visual adjustments, such as the new icons, fonts and more modern and contrasty color schemes, we worked hard on optimizing the user-friendliness. You can notice our improvements especially in shorter click paths and a better arrangement of the interface in general. The Sidebar provides some first impressions...
Refurbished and more intuitive Sidebar
Global search swaps with "Add content”
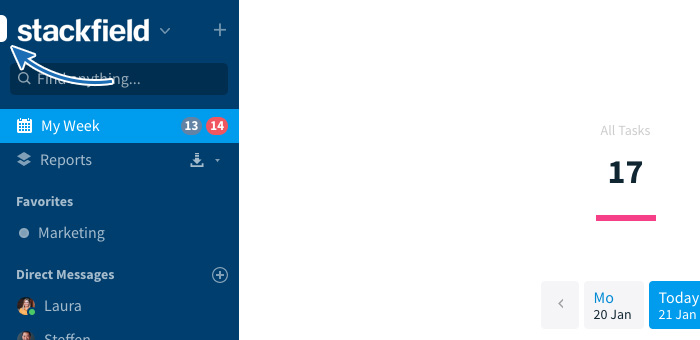
In order to make the "Global Search" easier to find, the magnifying glass symbol has been replaced by a search field at the top of the bar. If you want to skip this click, you can of course still access the "Global Search" by using the shortcut Ctrl+K. In exchange, the button for creating new content (New Room, New Appointment, Invite New Member etc.) - a function that is rarely used in contrast to the search function - has been moved to the upper right corner of the bar.
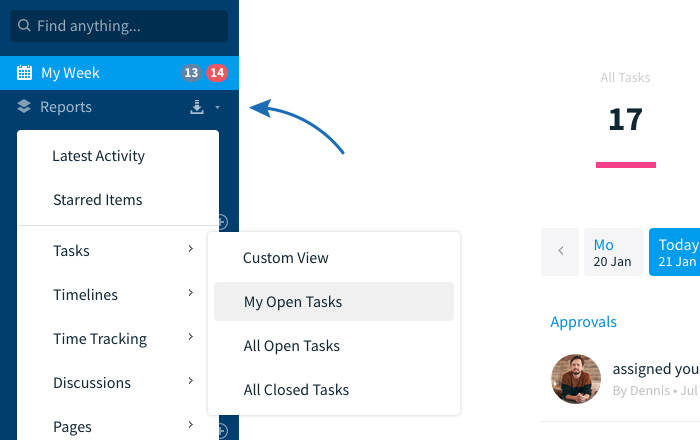
Everything function becomes reports
Unfortunately, the Everything-function has been confusion quite often in the past - for example, it made the impression of a button for adding content. However, its sole purpose is to provide a global overview of all the content in the organization with various filter options. For this reason, it has been renamed to ‘Reports’ according to its real function - a room spanning reporting function.
Switch easily between multiple organizations
For all users who are member to more than one organization, switching between them is now much easier. So far, this was only possible by going to "Personal Settings" (by clicking on the organization name at the top of the sidebar or by clicking on the user name at the bottom of the sidebar) and selecting "Switch Organization...".
A new feature is the red or white colored field in the upper left corner of the sidebar. By clicking on it, the platform will lead the user directly to a list of all organizations he is member to.

If there are notifications from other organizations, the field will be displayed red. Otherwise, it is just white.
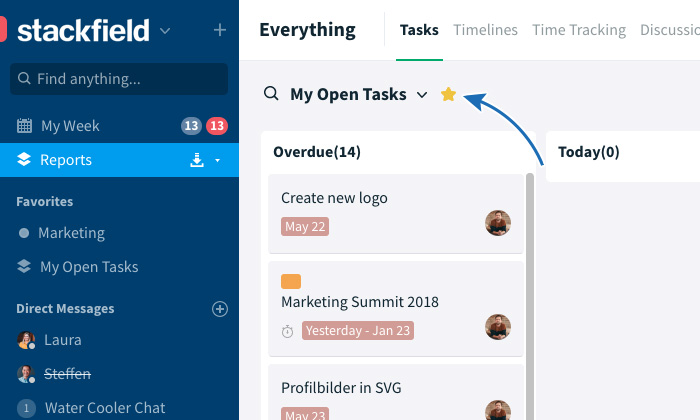
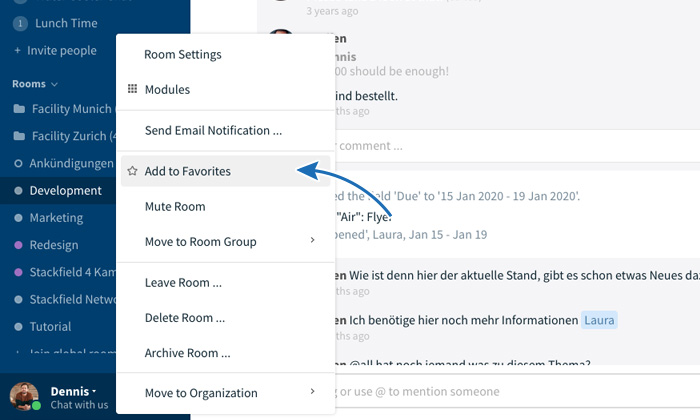
Highlighted favorites
Moreover, there were one or two adjustments to the favorites. So far, favorites have only been highlighted with an asterisk. However, this did not always prevent long searches, especially in case there were a large number of rooms and room groups involved. For this reason, favorite rooms, direct messages, or global views from the reports will now appear in a separate list above the rooms, which shortens the path to calling the desired favorite.
You can add favorites using the star icon in the header area of the individual views.
For rooms, you can additionally use a right-click right on the room name in the sidebar.
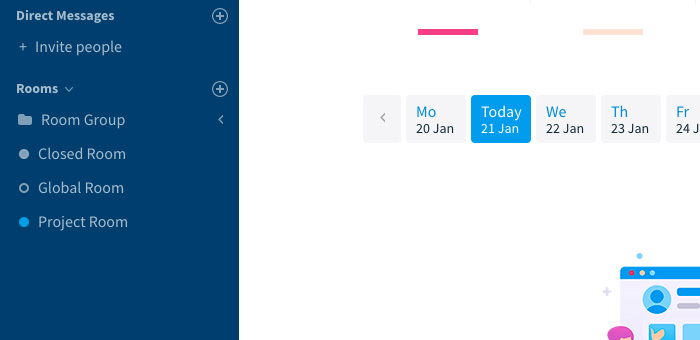
Direct Messages
A separate listing in the sidebar was also given to the "Direct Messages", which means that the way to individual chats became much shorter. Adding new Direct Messages is done in the same way as for the rooms, either by using the "Plus" button or automatically as soon as a new message pops up.

If the chat is located in the sidebar, it can now be accessed with a single click on the name. Also, by mouse overing individual chats, a small "x" symbol appears, which can be used to easily remove chats from the view.
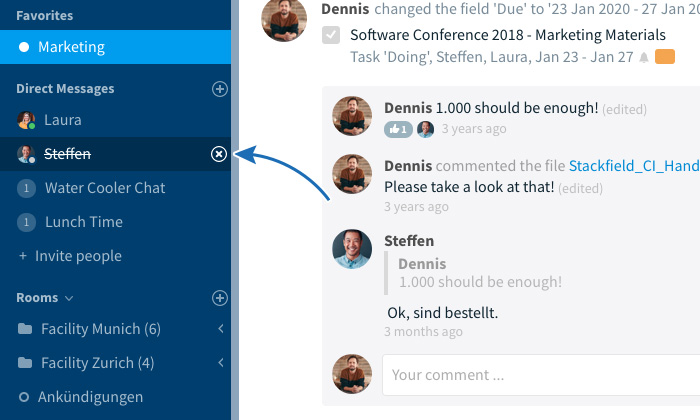
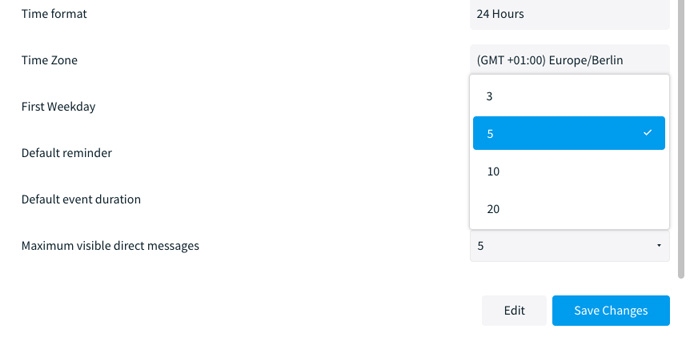
Note: To prevent the Direct Message view in the sidebar from becoming too extensive, it can be individually limited to 3, 5, 10 or 20 chats in the user settings. To do so, go to "My Account" and find the option "Maximum number of direct messages displayed" in the "Profile" tab.
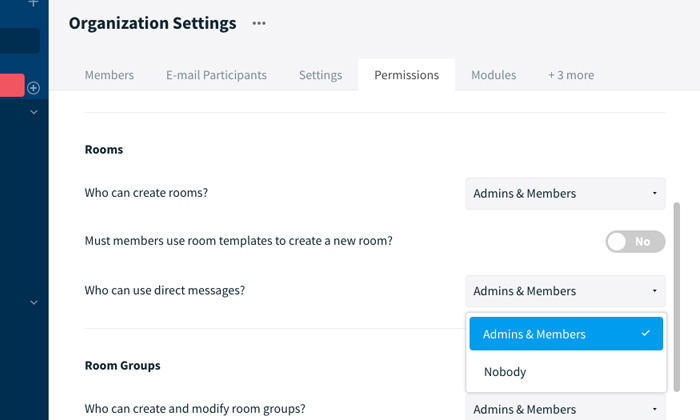
Note: Direct messages can now also be deactivated for all members at the organization level. So if you don't need the direct messages - e.g. because a different chat tool is specified for the company - you can simply switch off this feature within the organization settings - Permissions - "Who can create direct messages?".
But enough about the visual and practical improvements. Let's dive into the bigger innovations.
Three room types for Stackfield
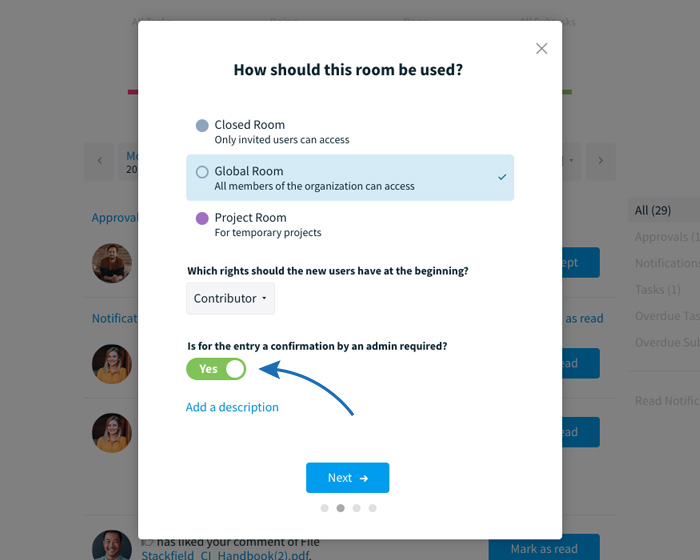
Stackfield's rooms are used in many different ways and reflect a variety of processes. Users operate extensive project management, they work with extremely sensitive data or they simply want to make teamwork more efficient and provide content for all employees. We thought Stackfield should be adaptable to these different ways of working. No sooner said than done - three rooms for different needs: Closed Rooms, Global Rooms and Project Rooms. The former is well known, but we are now introducing the new variants:
Global Rooms
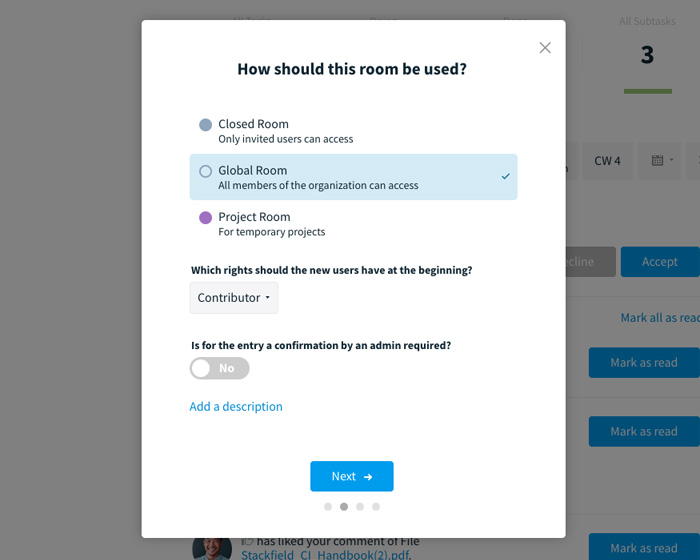
The new Global Rooms stand in contrast to the Closes Rooms. They are "public", i.e. accessible to all members of the organization (in the role of an admin or member). Simply put, this means that a user can join a Global Room independently. He does not need to wait for the admin to add him. This type of room is useful for providing company policies, general information or news that might be relevant to everyone.
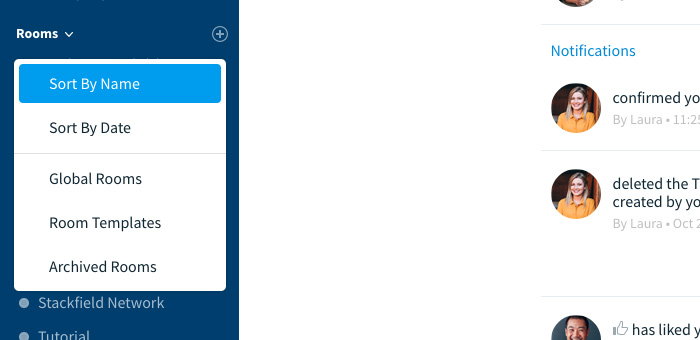
A list of these public rooms is displayed in the sidebar by clicking on "Rooms" and then selecting "Global Rooms" (in the drop-down menu, where you can also find room templates and archived rooms).
In the following dialog box, the user sees all global rooms…
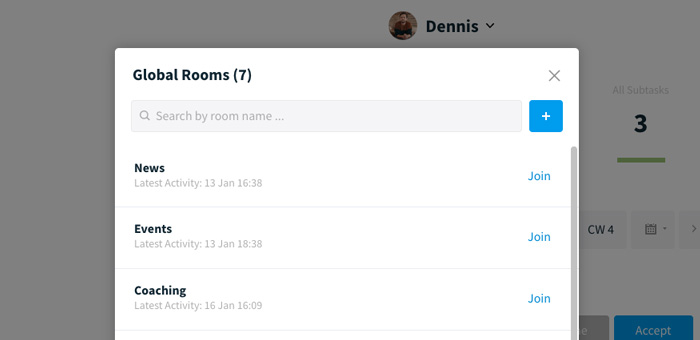
...and can join them as desired.
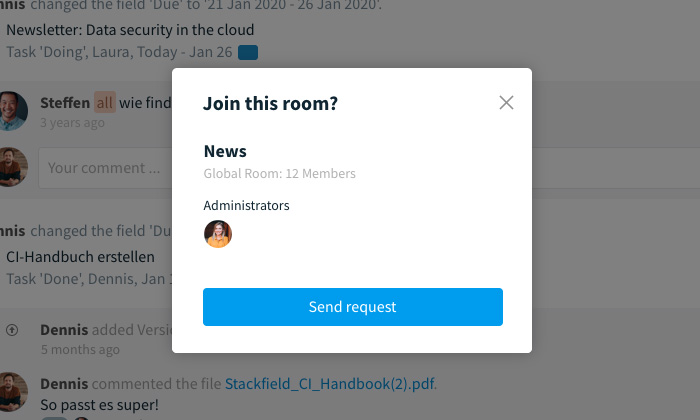
Caution: Please be careful with sharing sensitive information in public rooms. Especially personal data may not be viewed for any employee. For Global Rooms an additional step can be defined to increase security. For example, when creating the room, you can specify that confirmation by the admin is required as soon as someone wants to join the room.
To allow for a small security barrier, the creator of the room has the option to require confirmation of participation by the admin as soon as a member wants to join the room.
Note: Also Global rooms can be created encrypted or unencrypted. If the encryption key is not transmitted automatically because no other room member is online, activation by the room admin may be necessary.
Project Room
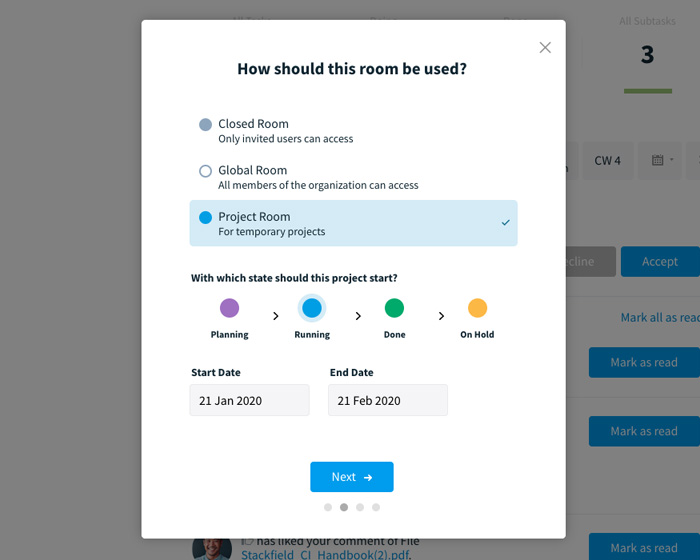
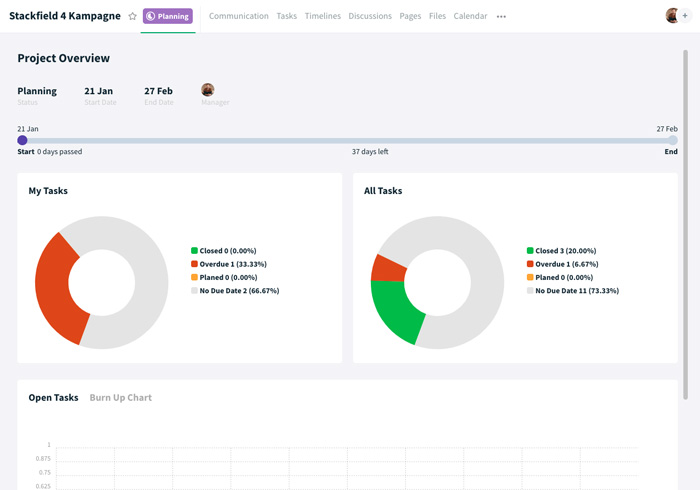
The third variant is a project room specially designed for project work. This type of room includes a project-specific planning overview that shows all open, overdue and completed tasks and process progress using charts and a timeline. It also lists the project manager (here, it will always show the room admin as an project manager) as well as start and end dates. The overview can be accessed in the room by clicking on the color-coded project status in the header area of the view.
Note: In order to get an exact overview of all projects of the organization, a global project page will follow to be part of Stackfield, as well.
Our learning center provides all information on how to create rooms and how to work with them.
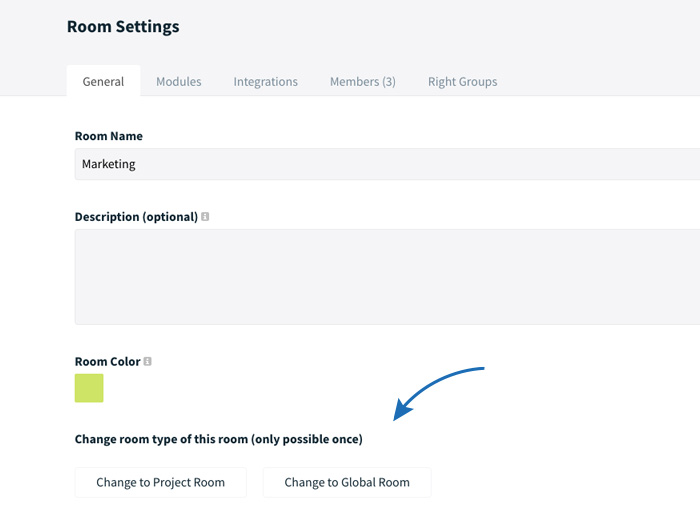
Note: Room Admins have the option to convert rooms that were created before Stackfield 4 into one of the new room types - a Global Room or Project Room - once. The conversion is possible in the room settings under the tab "General" (at the very bottom).
How rooms are displayed within the sidebar
In order to keep the room list as clear as possible and to make the different room types identifiable, some improvements have been made to the display.
As already indicated, global rooms are only displayed after joining. How this works has been explained in the section "Global Rooms".
Understanding Room Icons
Room groups are no longer represented by a colored dot but by a folder symbol. Instead, colors now differentiate rooms. This means, the different rooms and room types are now displayed with (colored) icons.
- Closed Rooms are displayed with a white filled out circle.
- Global Rooms are displayed with a white ring (unfilled circle).
- Project Rooms are displayed with a colored circle. The current project status determines the color.
The following status colors are assigned to project rooms:
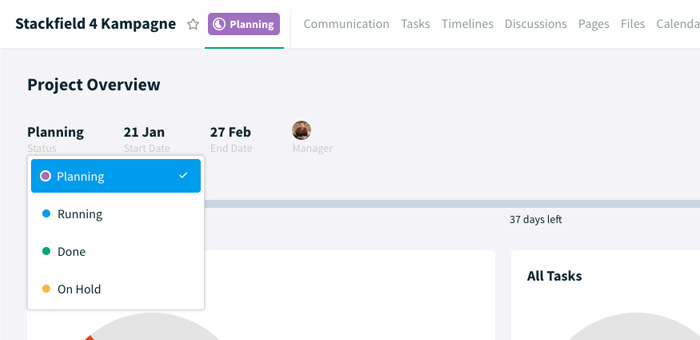
- Project is in “Planning" = purple
- Project is "Running" = blue (special case: the project is "Running", but has exceeded the due date and is therefore "Overdue" = red)
- Project is "Done" = green
- Project was put "On hold" = yellow
As shown in the screenshot above, you can change the project status by clicking on the current status within the project overview.
Tasks and their visualization
There have also been some changes to the tasks. Changes concern the structure of the tasks themselves, but also their visualization on lists and boards.
Custom Fields
In order to optimize the task processes for multiple use cases, you can define various user-defined fields for tasks in a room - if necessary and desired. These are individually customizable input fields that are created and added by the room administrator - in other words, they are located in each task. Tasks can be extended as required - by adding an additional date for an important interim appointment, by a contact person, or by a drop-down list that specifies certain cost centers. There are no limits to the creativity of the team leaders.
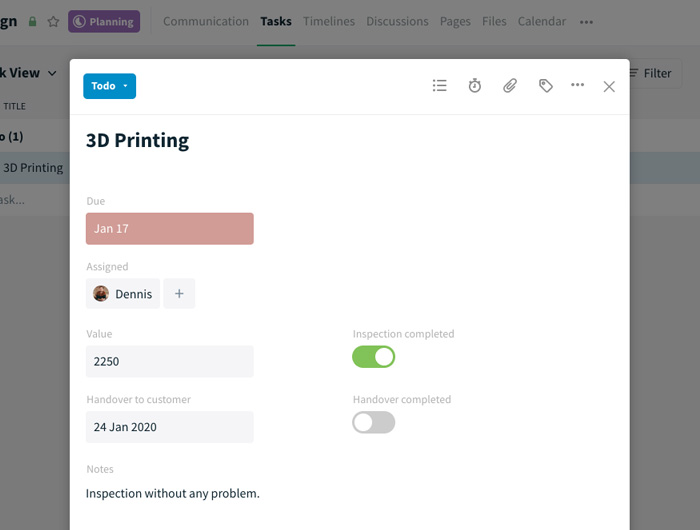
The following customized fields are available:
- Checkboxes
- Additional dates
- Dropdown lists
- Number fields
- Textfields
- Additional textboxes
- Additional user referrals
If you want to define additional fields, you have the following options:
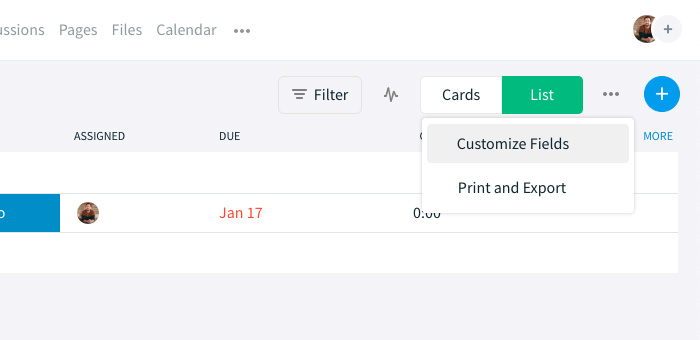
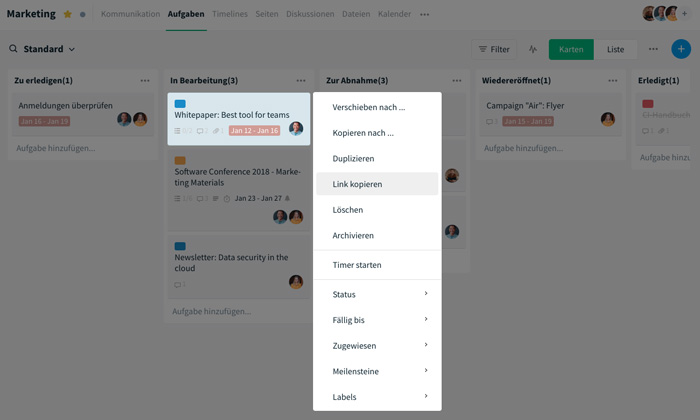
a) Click on room settings and open the modules tab. The "Tasks" module is the only module that contains the "Settings" option under which user-defined fields can be edited or newly created and titled by clicking on the "Plus" symbol.
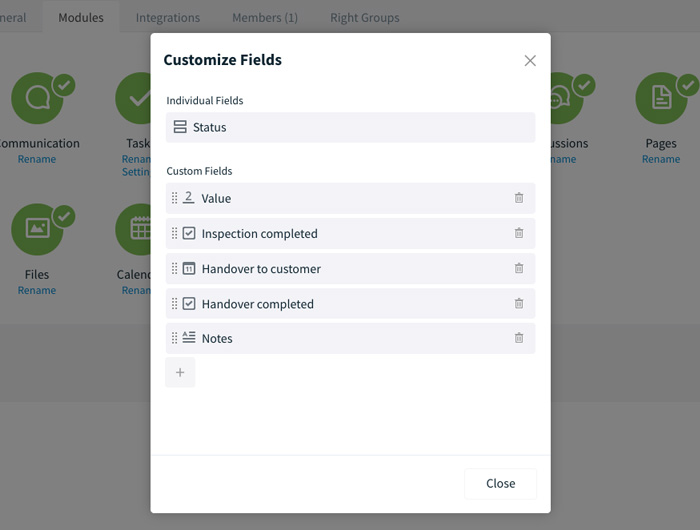
b) Click on the "more" button (three-point symbol) in the "Tasks" module and select "Customize fields".
@assigned
Another useful additional feature is the new @ mention in tasks. If the @assigned mention is added to a comment in the task, all members to whom this task has been assigned are notified.

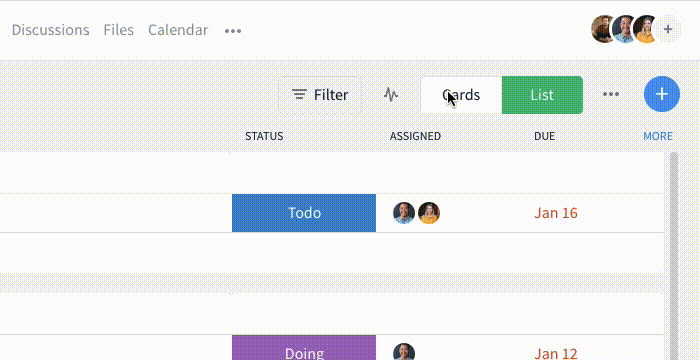
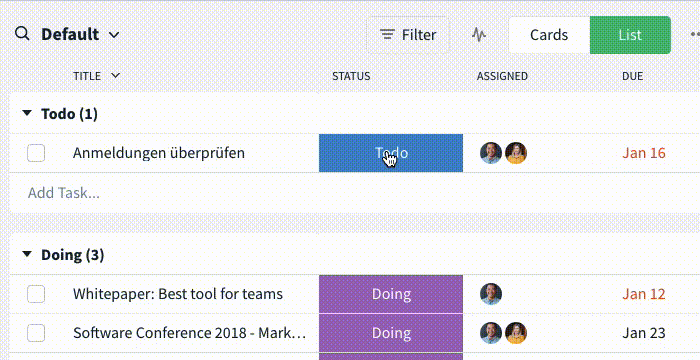
Visual representation with lists and boards
The list and board views have been updated in terms of design. The header area of the views has now become much more intuitive through a decent restructuring. It is now possible to switch between lists and boards with just one click.
The editing symbol, which appears in the Kanban Board when mouse overing a card, now provides more editing options: for duplicating and editing the earlier set custom fields.
One of the biggest changes in the tasks area is probably the list view, which has changed to a grid structure and can display extensive information such as status, labels, assignment, data and all user-defined fields clearly arranged.
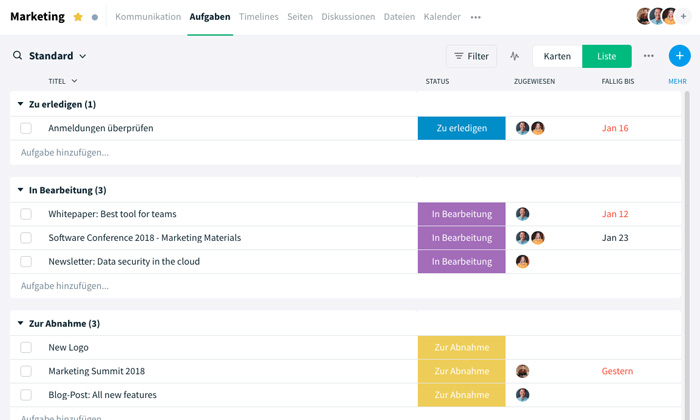
Using the "MORE" button (located just below the "Plus" symbol), additional columns can be easily added. If the list becomes too wide or if the tool/browser window is minimized, a horizontal scrollbar appears immediately to move the view.
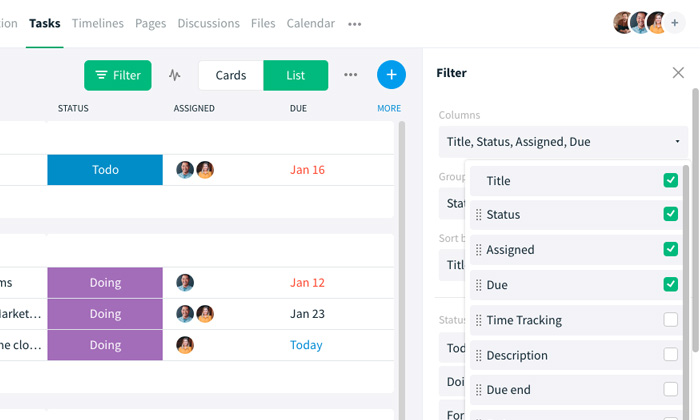
Some task contents can also be edited directly in the grid, for example assignments, (due) dates and labels, but also user-defined fields such as drop-down lists.
New functions for Pages (former Documents)
A similar striking change can be noted within the former documents module. The module has been given a general makeover under the new title "Pages" and has been rolled out completely new. Why? Many people were not clear about the purpose of the module.
The idea behind the documents was from the very beginning not only to enable users to work with documents, but also to provide a kind of "Wiki" in which basic information can be stored and made available centrally. A versatile document module, in fact, and it has been improved even further.
Let's start with the features in the pages themselves. Many will notice that the toolbar in the head area is no longer there. Instead, a formatting toolbar is displayed as soon as a text is selected…
...and a "plus" symbol that leads to another toolbar as soon as a new line is started.

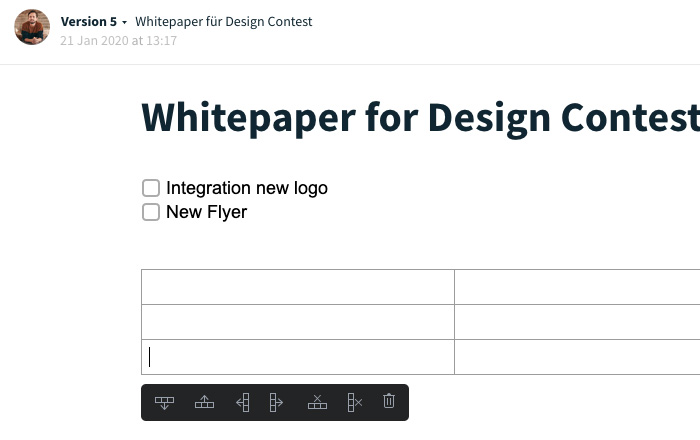
Both toolbars have some new features like for creating tables, inserting links or checkboxes or placing images directly on the page.
Note: Tables can be easily edited by using the right mouse button.
With image files it is possible for some time now to mark and to comment on specific parts directly in the image. With the update, this will now be possible on pages as well. You can add comments by using the comment icon within the toolbar that appears after marking the respective part of the page.
In addition, you can now create templates and even drafts that do not immediately overwrite a page and that are not visible to all room members. This allows members to work on pages without any rush and publish them as a new version only as soon as they have finished editing them.
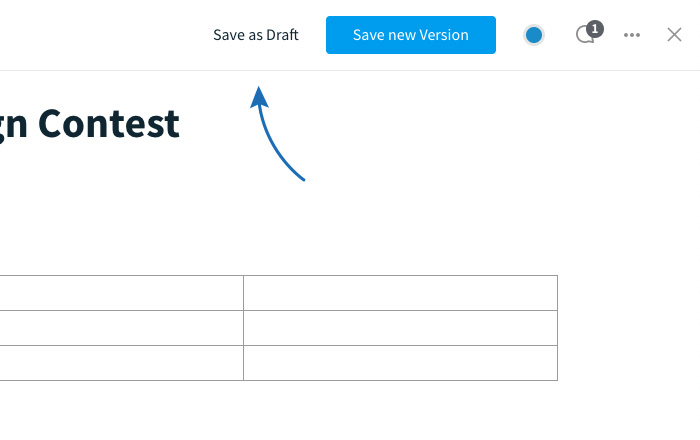
Finally, it is much easier to switch between the individual versions of the new pages. This can be done simply by clicking on the current version in the upper left corner of the header bar.
Stackfield Timelines aka Gantt Charts
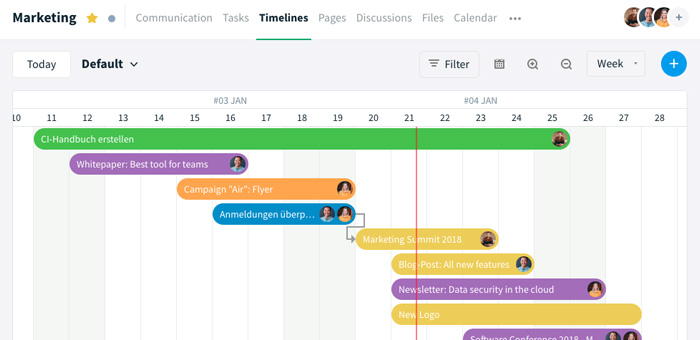
And here it is, the feature everyone asked for: the Gantt Chart (called Stackfield Timeline)! From now on, users can create links between individual tasks in seconds to display them in the timeline, taking into account their interdependencies. In this way it can be shown, for example, that task B is dependent on task A and can therefore only be started once task A has been completed. The project scope and duration are thus much easier to keep track of.
How can I use Stackfield Timelines?
To use the function, the corresponding module in the room must be activated. If this is the case, the Timelines module will be integrated into the room to automatically visualize all tasks in their chronological order. The chart will show all tasks of a room with a due date.
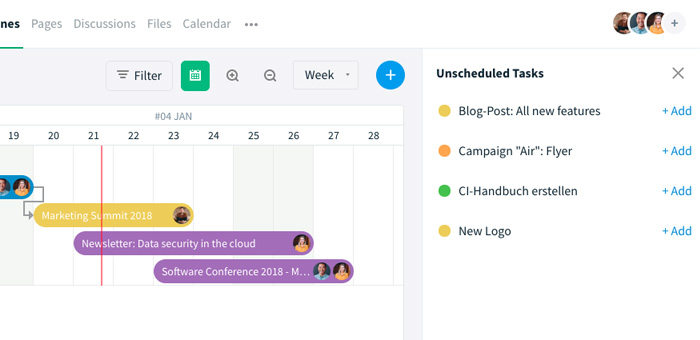
Tasks without a due date must be provided with a date to be included. The calendar icon in the header of the module lists all tasks without a due date and allows you to enter them directly into the chart by setting a date. You can simply move tasks to the required date.
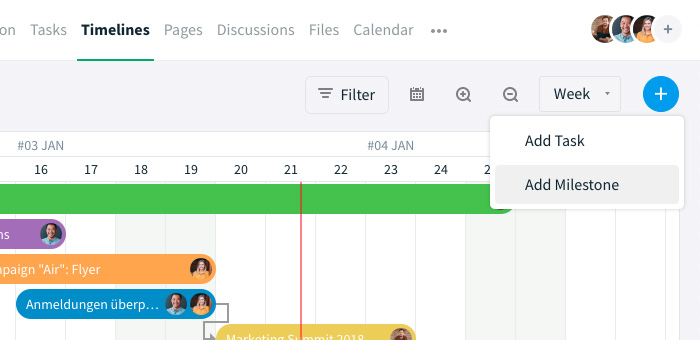
Note: You can create tasks right in the modules Tasks and Communication as before and from now on also by using the "Plus" icon in the Timelines module.
In addition to simple tasks, you can also display milestones in the timeline. These are represented by a diamond symbol. Milestones are suitable for defining and highlighting important intermediate dates. These can be added in the Timelines module using the "Plus" button.
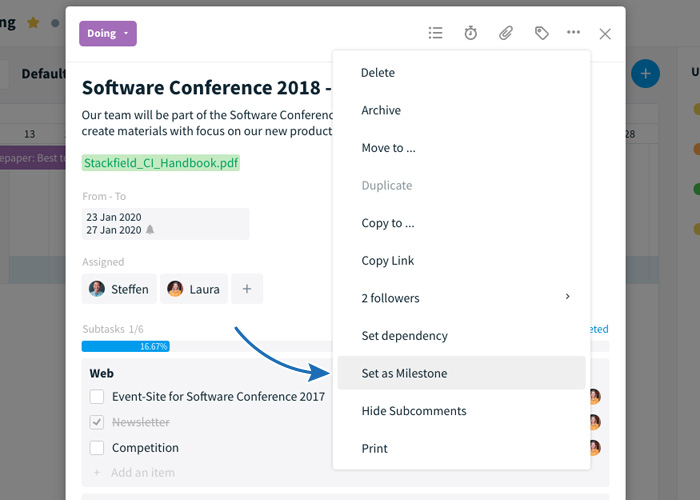
Alternatively, you can convert tasks into milestones. To do so, open a task card and click the "More" button (three-dot icon) and select "Set as milestone". In the same way, you can also remove the milestone again: by clicking on “Set as milestone” again, the selection will be reversed. Of course, you can also add dependencies to milestones.
How do I create dependencies?
You can create dependencies either directly in the task or in the diagram itself.
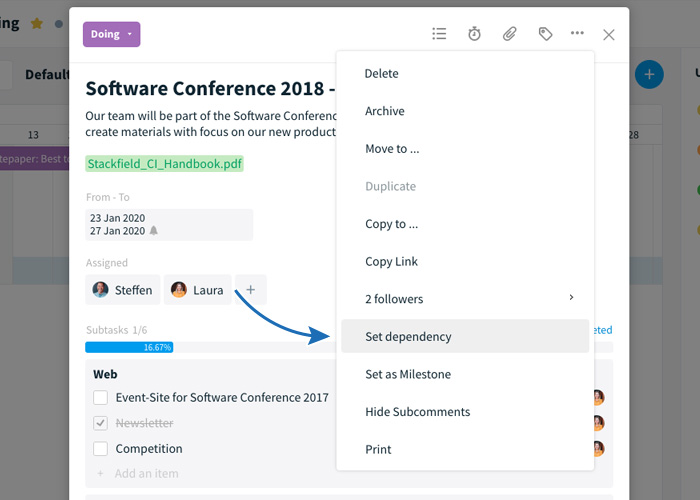
a) Within the task, you can add a dependency to another task by clicking on the "More" button (three-point symbol). To do this, select "Set dependency". A dialog box will open, where you can select a task from the list.
b) If you prefer to add dependencies directly in within the chart to keep an eye on the time structure, you can do this simply by using the drag & drop function. The connecting points appear to the left and right of the task bars after a mouse over. Starting from a point of the predecessor task, you can drag the dependency to the successor task.

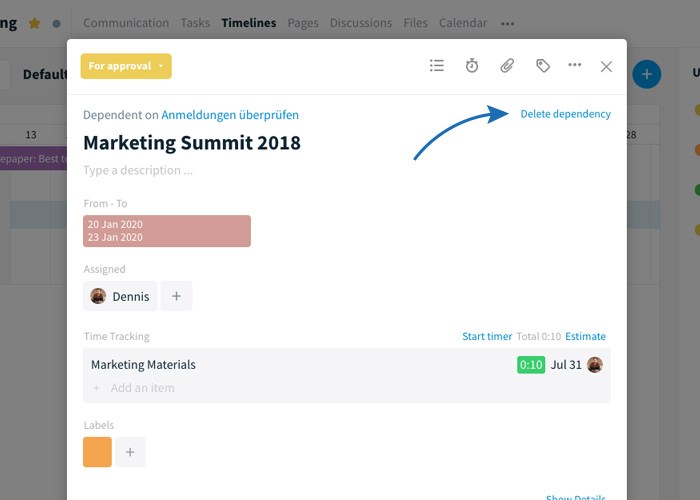
As soon as the dependency is set, the bars are connected by an arrow and the information appears in the successor task itself directly above the title. (Dependent on ...)
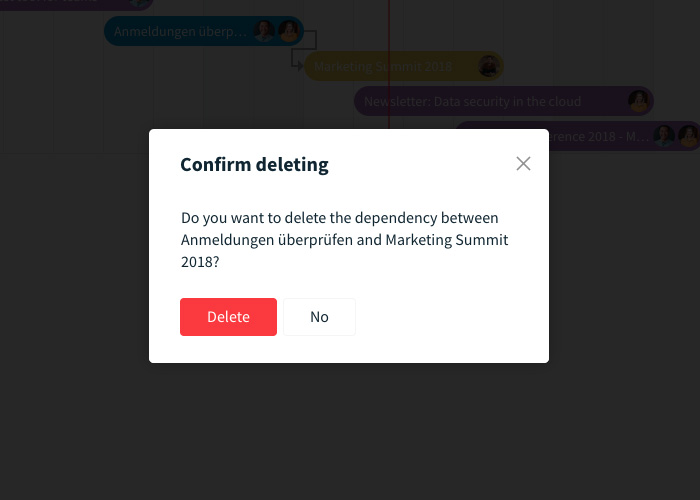
How do I delete dependencies?
You can remove a dependency either…
a) in the task - by clicking on "Delete dependency" in the upper right corner…
or b) in the Gantt chart by double-clicking on the link arrow.
What views are there in the Timeline?
The Timeline can be displayed in a weekly, monthly and yearly view. You can switch between these views by selecting the desired option in the top right-hand corner of the header area. The red line shows the current time and thus also, where the project is currently located.
You can edit the current view in the filter settings. Select...
- what calendar year should be displayed
- what columns (task name, start date, end date, duration) the view should contain
- what criteria should restrict the timeline (status, member assignment)
- how the tasks should be grouped together and/or sorted

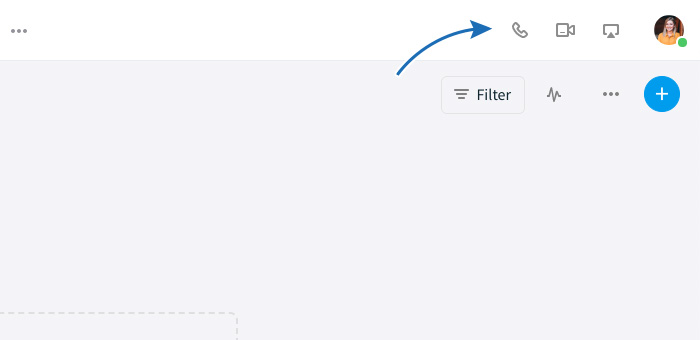
Audio calls/ video calls / screen sharing
A previously rather complicated function is now quite easy. With Stackfield 4, the telephony area has been optimized and expanded to include a neat option for screen sharing.
The means of communication can be used very easily via Direct Messages, which now have three icons in the upper right corner directly next to the user's profile picture: The telephone, camera and screen for audio calls, video calls and screen sharing between two communication participants.
If screen sharing has been selected, it is possible to specify exactly which part of the screen is to be shared.
What comes next after Stackfield 4?
That's it for now with the most important new features of Stackfield 4, but it won't take very long until further updates follow. The Enterprise functions will follow shortly! (within the next days)
The following features are on the agenda for 2020:
- Enterprise features and Global Project Views (coming in the next days!)
- Revision of mobile apps and iPad app
- Previewing of Office documents
- Linking of all elements to Stackfield
- E-Mail Integration
- More integrations: Office365, Jira, Salesforce...
Now, nothing remains to say but: We hope all our users have fun trying out the new features. Enjoy Stackfield 4!