Our latest update is packed with new features that make working in Stackfield even easier and more convenient. From live document editing to voice messages, we’ve got plenty of helpful improvements ready for you. Have fun discovering and trying them out.
Edit office files live in Stackfield
One of the most requested features from our customers is now here: the ability to edit office documents directly in Stackfield. Thanks to our new Collabora integration, this is now possible, along with a number of additional benefits.
Create new documents directly in Stackfield
The days of creating a document locally first and then uploading and sharing it in Stackfield are over. From now on, you can create your documents comfortably right within the platform. Best of all, you don’t need a separate office suite to do so.
At every relevant point, for example in chats, tasks, and of course in the "Files" module, you can create text documents, spreadsheets, and presentations at any time. These documents are generated in .docx, .xlsx, and .pptx formats. Once created, you can edit them, read them, and download and upload them again whenever you like. And of course, you can also upload existing office documents to Stackfield and continue working on them there.
How to create documents in the "Communication" module
- In the "Communication" module, click the gray "plus" symbol.
- Select "File".
- Choose "New Document", "New Table", or "New Presentation".
- The document will be created and you can start working right away.
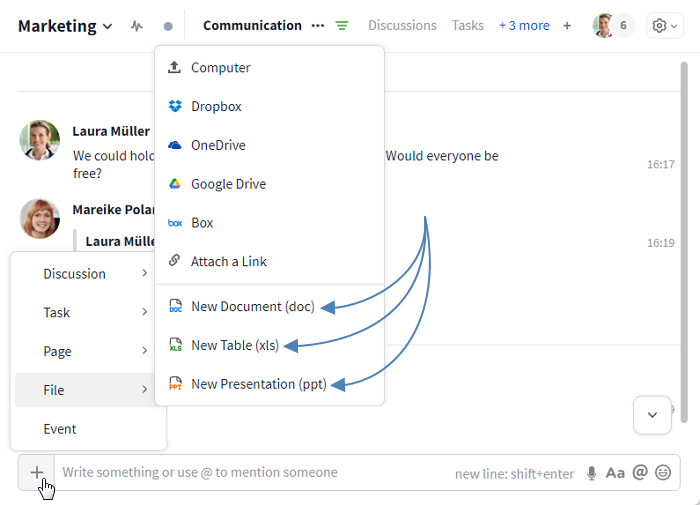
Create Office documents in the "Communication" module
How to create documents in the "Files" module
- In the "Files" module, click the blue plus symbol.
- Choose "New Document", "New Table", or "New Presentation".
- The document will be created and you can start editing it.
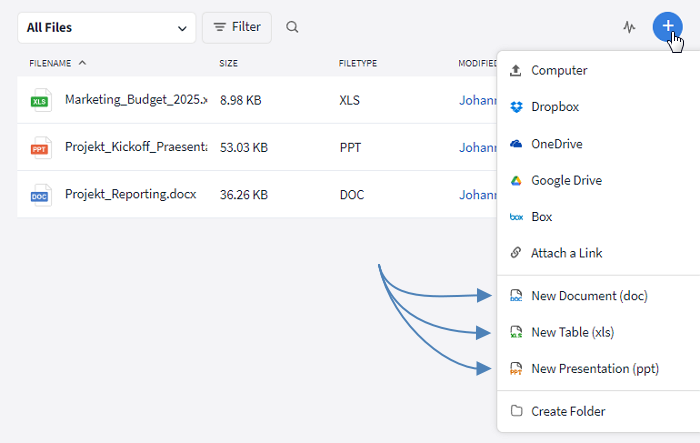
Create Office documents in the "Files" module
Edit Office documents on your own or together
Office documents in Stackfield can be edited just like you’re used to in standard office suites, from text editing to polished presentations and complex spreadsheets. The edit option is available for all supported file formats, either directly (see screenshot below) or via the file preview.
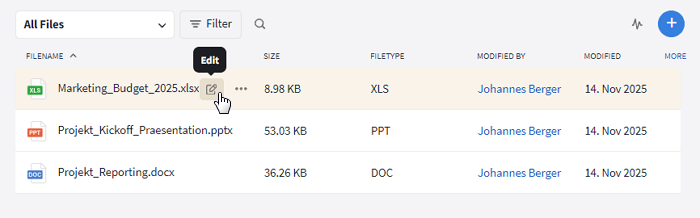
Start editing a document
Editing doesn’t have to be a solo task. With the new integration, multiple people can now work on the same document at the same time.
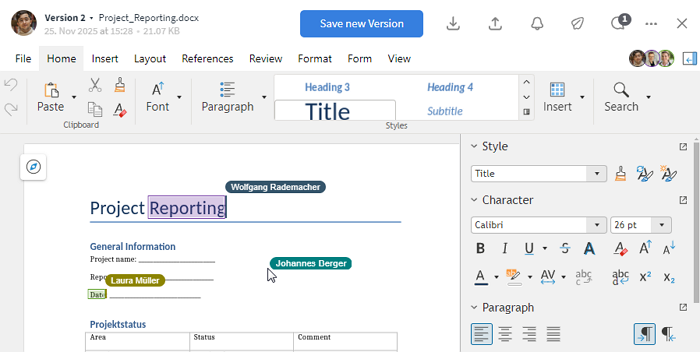
Documents can be edited by several people simultaneously
How to edit documents in Stackfield
- Click "Edit" next to a document.
(In the "Tasks" module: pen and paper icon)
- Choose how the document should be opened (see next paragraph).
- The document opens and you can edit the content.
- Optionally, other people can join at any time and edit the document simultaneously.
Choose how documents should be opened
You can now decide how a document should be opened when you want to edit it. To find these options, right-click any Office document and select "Edit Document". The following options are available:
- In the same window
- In a new window
- Edit locally
- Set default
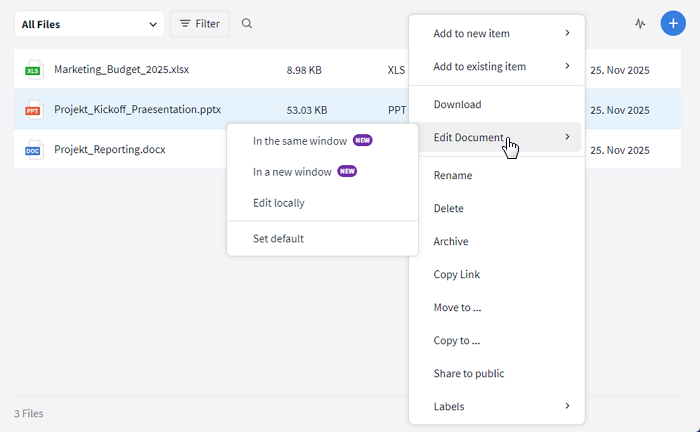
Stackfield users can choose how a document is opened.
In the same window:
This option opens the document in the window you’re currently working in. This applies whether you use the desktop app or Stackfield in your browser.
In a new window:
This opens the document in an additional Stackfield tab in your default browser. This also happens if you open the document from the desktop app.
Edit locally:
This option downloads the document from Stackfield and opens it in your default program for that file type.
Set default:
Here you can choose which of the three opening options should be used by default when you click a file in Stackfield. You can change this setting at any time. It only applies to your personal Stackfield account.
Work with voice messages
Alongside chat as well as audio and video calls, this update introduces another way for you to stay in touch with others in Stackfield: voice messages. This feature is now available to users on all Stackfield plans.
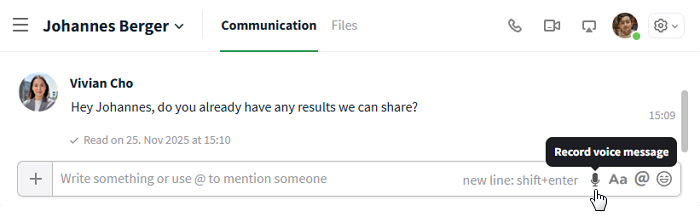
You can use voice messages just as you know them from similar tools or messaging apps. Simply click the record button (microphone icon) in Direct Messages or in the "Communication" module to start recording, and speak your message for example through your headset.
Recording a voice message
How to send a voice message in Stackfield
- In a chat or in Direct Messages, click the record button.
- Speak your message through your headset.
- Finish the recording by clicking the checkmark.
- Click "Send" to send the voice message.
This update is a first step toward bringing voice messaging to Stackfield. Further enhancements will follow, enabling voice messages for example in comment sections and in the mobile app.
Work even more effectively with recurring events
Recurring events, meaning events that take place at regular intervals such as weekly or monthly, can now be used more flexibly and with less effort. The improvements include:
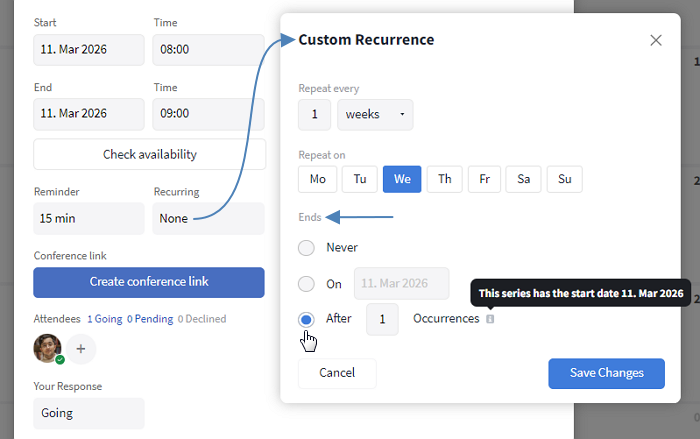
Custom recurring events:
You can set up recurring events to take place only on specific weekdays, for example every Thursday.
Custom recurrence start:
Recurring events can start on any date, whether it is in the past or the future.
Custom recurrence end:
You can set a specific end date, which is useful for time-limited event series.
Recurring events can be ended individually
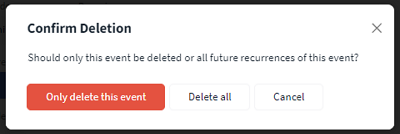
Delete or change recurring events individually or as a series:
When deleting or changing the date of recurring events, you can choose whether to remove / change just the selected event or the entire series.
Recurring events can be deleted individually or as a complete series
Occupancy planning expands your events
Event creation has been extended with a practical occupancy planning feature. It allows users to assign a physical meeting room to an event at the same time as creating it. Meeting rooms can be named individually.

Using occupancy planning in an event
This new feature is complemented by an overview of meeting room availability and invited participants (as long as they are stored in Stackfield). You can open this view in any event by clicking "Check availability". This makes it easy to see at a glance whether a room is already booked or still free at a given time, and whether the invited people are available for the selected slot.
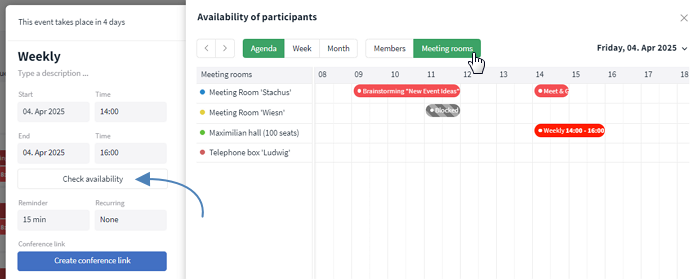
View of the meeting room availability overview
You can also view a full occupancy planning overview in the Reports. You can find this feature in the Stackfield sidebar under "Reports", in the "Calendar" tab, followed by "Room occupancy plan".
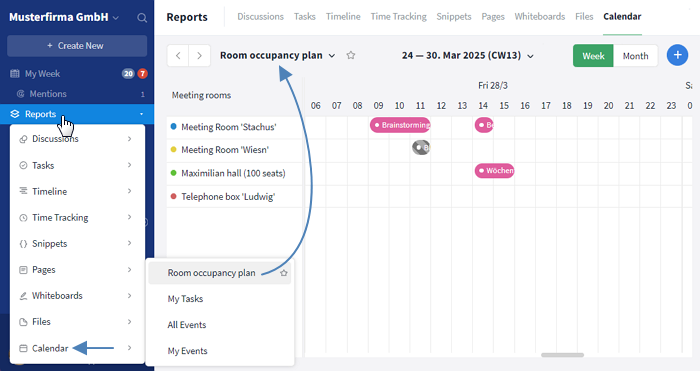
Occupancy planing overview in the Reports
This overview shows all meeting room occupancies stored within your organization. Events in rooms you have access to are displayed in color along with their title and time. You can open an event by clicking it. Events in rooms you do not have access to are shown in dark gray as hatched blockers. When you hover over an event, the full title or the note "Blocked", as well as the time, is displayed.
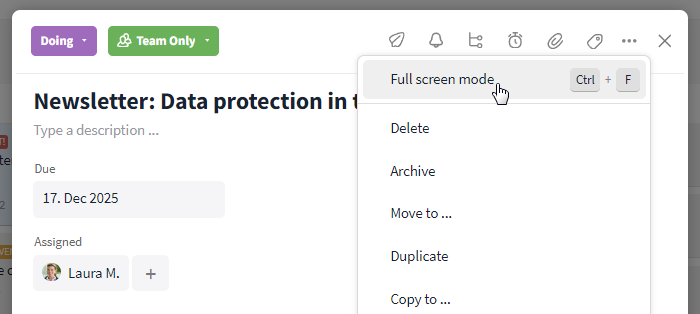
Full focus with fullscreen mode
Would you like to concentrate fully on a task without being distracted by other content? With the new fullscreen mode, that’s now possible. It lets you display individual tasks across your entire screen so that only the relevant task content remains visible.
Enable fullscreen mode in Stackfield.
You can turn fullscreen mode on and off in any open task using the shortcut "Ctrl + F". Alternatively, you can enable or disable it via the three-dot menu within a task.
In the "Discussions" module, fullscreen mode is now the default view for individual discussions. Of course, you can still deactivate or reactivate it there at any time.
Tip: If you use Stackfield in your browser and want to use the browser search via "Ctrl + F" while in fullscreen mode, click into a text field first and then use the shortcut.
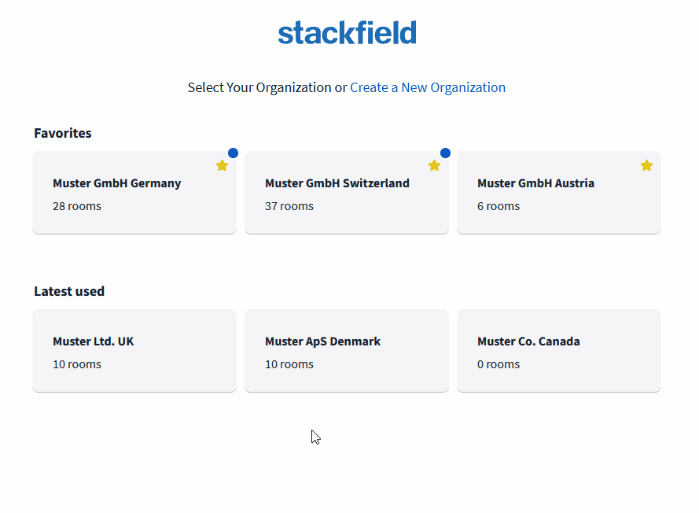
Organize your organizations
If you work in multiple organizations at the same time, you can now mark individual organizations as favorites and access their content faster. As soon as you have two or more favorited organizations, they will appear in the Stackfield sidebar. You can switch between favorites with a single click.
In the sidebar, you can also reorder your favorites by dragging them via their icon or letter shortcut while holding down the mouse button. Clicking the three-dot menu takes you to the organization overview.

Favorited organizations in the sidebar
Tip: In the organization settings, you can upload a custom company icon in Stackfield (120 × 120 pixels). This icon will then be shown in the favorites list in the sidebar instead of the letter shortcut. You can find this new option under "Settings" and then "Custom favicon".
In the organization overview, you can also set favorites and arrange them in any order you like. Just as in the sidebar, this works via drag and drop while holding down the mouse button.
Set and reorder favorites in the organization overview.
More options for custom fields
The options for creating custom fields have been expanded. Going forward, you’ll have even more ways to equip your tasks with exactly the fields you need in your day-to-day work. We have added the following field types:
- Email: This field automatically detects the email address you enter and turns it into a clickable link, so you can open it directly from the task.
- Hyperlink: This field automatically detects links to websites and makes them clickable, so you can open the page directly from the task.
- Phone: Here you can enter any phone number, including special characters if needed.
- Currency: This field allows you to enter a value of up to ten digits. You can also choose the display currency from a selection of units.
- Percentage: Using the slider, you can select a value from zero to one hundred in steps of ten percentage points.
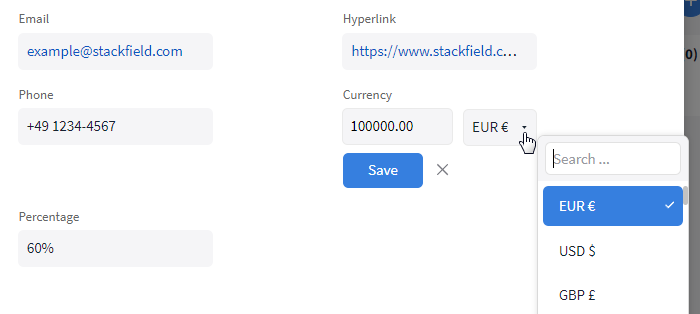
Example content for the new custom fields.
Hide all room groups
From now on, you can hide not only empty room groups, but also all room groups at once whenever you need to. You’ll find this setting in the Stackfield sidebar by clicking the arrow next to "Rooms".
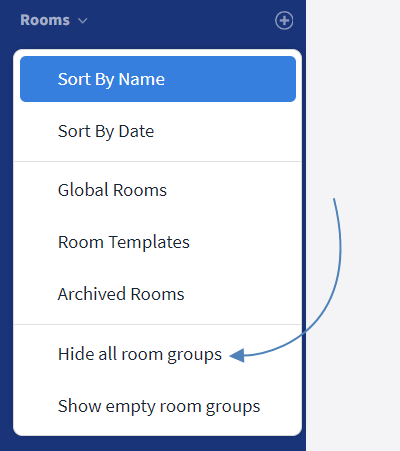
Hide all room groups at once when needed
Select "Hide all room groups" to collapse every group. You can re-enable them at any time via the same menu.
This is especially useful if you want to sort all active rooms. By sorting by date, for example, you can quickly see which rooms were edited most recently and are therefore the most relevant.
Jump to the latest task comment
In tasks with lots of activity and many comments, you can now jump straight to the most recent comment with a single click. For this, the new "Scroll-Down Button" is available.
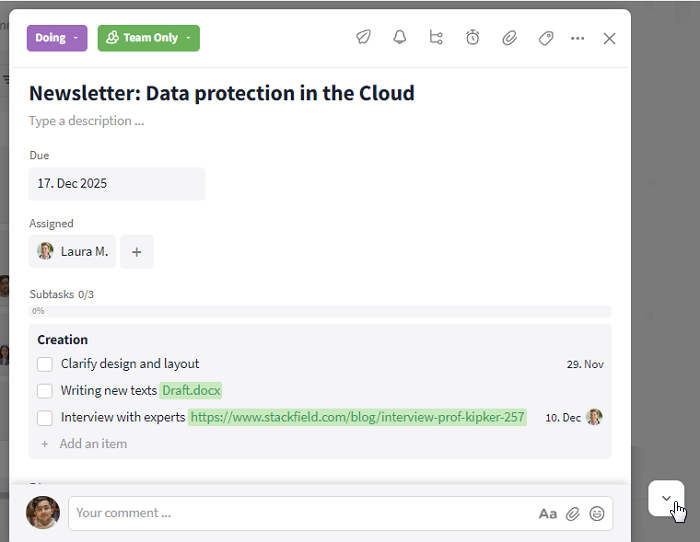
Use the "Scroll-Down Button" to jump to the latest task comment
The button appears automatically in the bottom right of a task once enough comments are present and takes you directly to the newest entry.
Tag users when uploading files
You can now tag room members directly when uploading a file in the "Communication" module using an @-mention. This is particularly helpful if you want to notify a specific person immediately about a new upload.
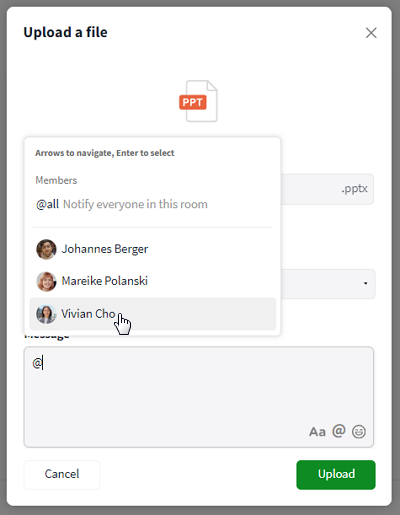
Tag users when uploading files
Discussions and polls in group chats
With this update, you can create and edit discussions and polls directly in the "Communication" module. Click the "plus" symbol to the left of the text input, select "Discussion", and then choose whether you want to create a topic or a poll.

Start discussions and polls directly in the "Communication" module
Status changes during a call
We’ve expanded the status feature with the option "Automatically switch to Busy". When enabled, your status will automatically change to "Busy" as soon as you start an audio or video call.

An automatic status change is now available.
You can find this option under "My status" in your personal user settings. To use it, your status must be set to "Available" before the call starts. During the call, it will switch to "Busy" and also show the note "In a meeting". Once the call ends, your previous status is restored automatically.