Communication channels and their availability
The "Direct Messages" area is used for communication outside of the rooms. Conversations that cannot be related to any of the room-specific team chats and those that should not be conducted between all members of a room are given a corresponding channel here.
Communication channels and their functions
- Chat (incl. file exchange): private chats and group chats
- Audio calls (in pairs or in groups) = talking
- Video calls (in pairs or in groups) = talking + seeing person
- Screen transmission (in pairs or in groups) = talking + showing screen
Direct Messages in the sidebar
The "Direct Messages" area in the sidebar
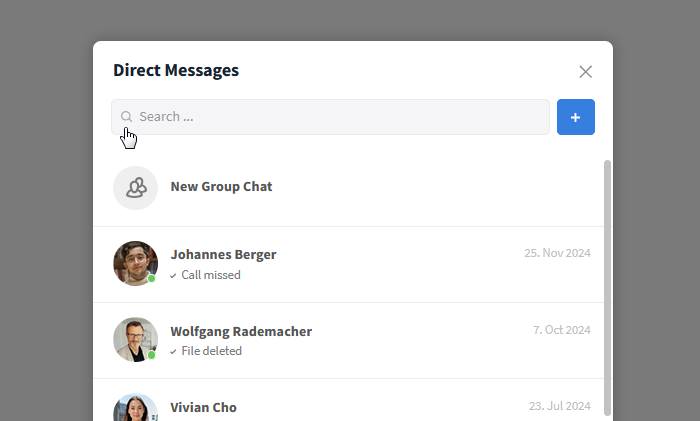
In the left sidebar there is a separate listing for the Direct Messages with current private chats and group chats. These are represented by a circle symbol or by the profile picture of the respective user (if available).

Display of Direct Messages in the sidebar
Adding new chats is done in the same way as for rooms, either by using the "Plus" button or automatically as soon as a new message is received. If the chat is already in the sidebar, it can be opened from now on with a single click on the name.
When you mouse-over individual chats, a small "x" icon will also appear, making it easy to hide chats from view. The number of displayed chats can be limited individually.
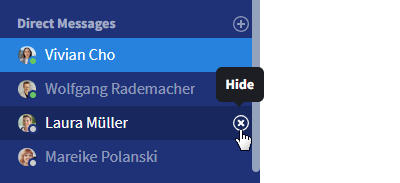
Hiding a chat from the sidebar
Presetting: Number of displayed chats in the sidebar
To prevent the view of direct messages in the sidebar from becoming too bulky, it can be individually limited to 3, 5, 10 or 20 chats in the user settings. To do so, go to the "My Account" section and find the option "Maximum number of direct messages displayed" in the Profile tab. New messages won't be missed, the list always shows the current chats.
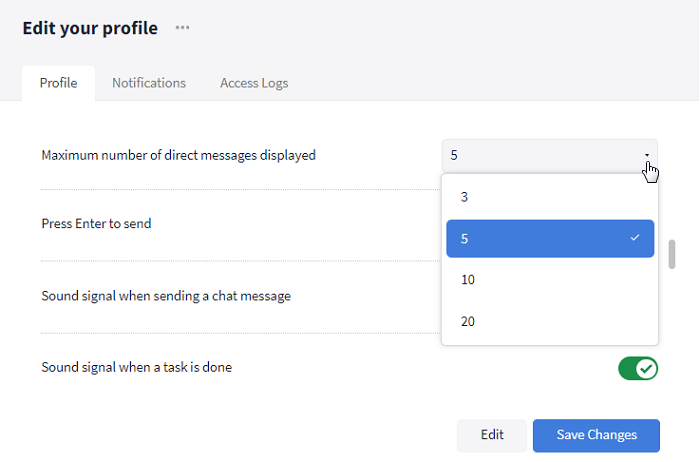
Number of direct messages in the sidebar
Favoring chats
Chats that are used more frequently can be favored by clicking on the star symbol in the chat header. They disappear from the "Direct Messages" list and move up as a constant to the Favorites" area.
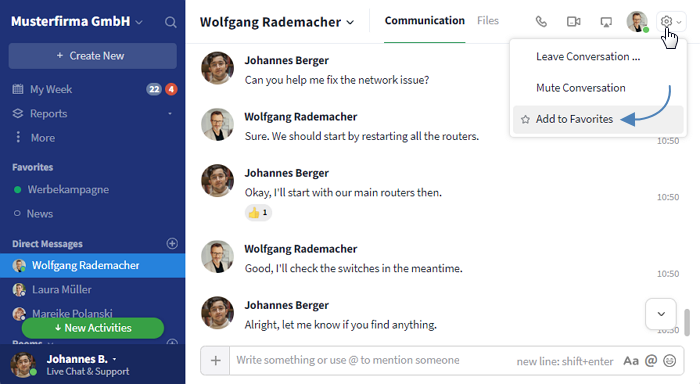
Chats can be favorited
Starting a private chat or group chat
Starting a new private chat
- Click the "plus" icon to the right of "Direct Messages" in the sidebar.
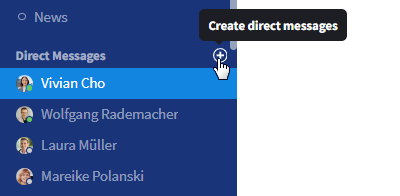
You can create a new privat message by clicking the plus symbol
- A dialog box opens in which you can select a communication participant from a list. Use the search function to find the desired user faster.
Select the desired participant from the list or simply search by name.
- A new chat will be created. Start the conversation by "texting". Enter a message in the text field at the bottom of the view and click Enter (or the send button).
Starting a new group chat
If you want the exchange to take place between several participants, simply create a group chat instead of a private chat.
Start a group chat
- Click the "plus" icon to the right of "Direct Messages" in the sidebar.
- A dialog box opens where you can select a communication participant or an existing group chat from a list. In this case, however, the option at the top of the list is relevant for you: "New group chat".
- The "Create new group chat" screen appears. Choose a name for your group chat and click "Next".
- Now select the desired participants – by entering (name / email address) or via "Browse".
- Click on "Create New Group Chat".
- A new group chat is created. Start the conversation by "write to". Enter a message in the text field at the bottom of the view and click Enter (or the send button).
Chat functions
The following basic chat functions can of course be used in both group chat and private chat.
Telephony
To be able to communicate directly with all communication partners included in the chat, audio, and video calls, as well as a screen transmission, can be started. There are three icons (phone, camera, and screen) in the upper right corner of the view).
Direct calls (+ screen transmission) between just two communication partners take place in a private chat with the respective person, conference calls via group chats (alternatively also via appointments in the respective rooms).
You can find all information about using the telephony functions here.
Responding to messages
As in the team chats of the individual rooms, you can also reply to messages in the chats. Use the "reply arrow" button that appears at the right end of the message when you mouse over it. To the right of it, there are two more icons that you can use to "like" the message ("thumbs up" button), add it to your favorites ("three dots" button), or add a reminder ("three dots" button).
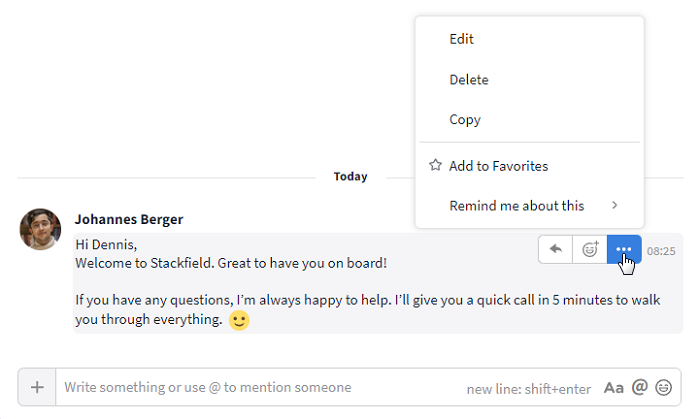
The options for editing a message can be found via mouseover
@-Mention
Mark communication partners using the @-Mention in messages to address them directly, or all members included in the chat (@all). Mentioned members will be notified accordingly.
This is done by clicking on the @-symbol in the text input field and by simply typing the @-symbol.
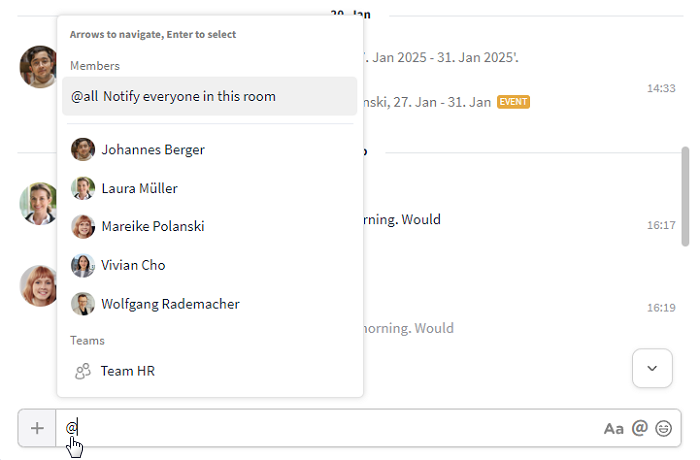
Mark members using the @-mention.
Emojis
Numerous Emojis, stickers, and Gifs give your messages expression. The emoji picker opens by clicking on the emoji symbol in the text input line.
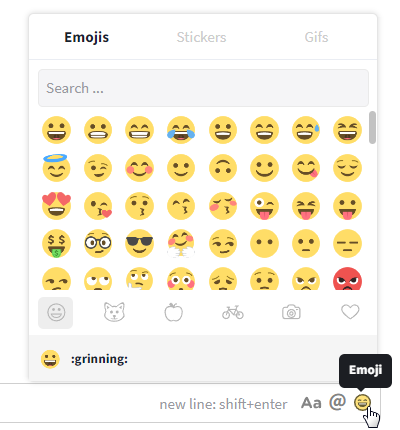
Select emojis, stickers, or gifs by clicking on the emoji icon.
Exchanging files
Of course, files can also be forwarded in the chat. This can be easily done by drag & drop or by using the "Plus" button at the left end of the text input field. All files are collected in the module tab Files in the chat. The functionality of the file module in the chat corresponds to the scope of the Files module of the rooms (administration in folders, marker function etc.).
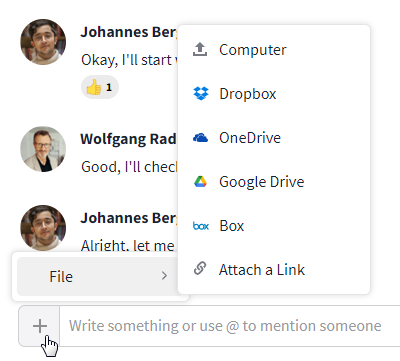
With the "Plus" icon you can send files in the chat.
Leave, delete or mute a chat
Leave, delete or mute a private chat
Via the "More" button (symbol: three dots) or by clicking on the name of the conversation partner, further options for the private chat can be accessed:
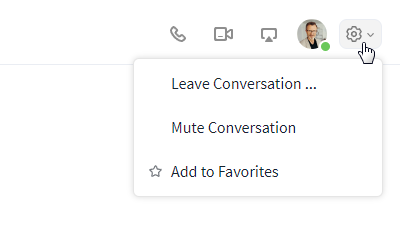
Further chat options
- Leave Conversation / delete: By clicking the corresponding button in the drop-down menu, the participants can "leave the conversation...". As soon as the second (and thus also the last) participant leaves the conversation, a dialog box opens. This dialog box informs the participant that the conversation is irrevocably deleted by this action. This must be confirmed by entering the word "OK".
- Mute Conversation: Via the corresponding button in the drop-down menu a participant can "mute the conversation". No more push notifications outside of Stackfield are sent. Only the red message in the sidebar remains.
Leave, delete or mute a group chat
Note: Only a "group admin" can delete a group chat!
Use the "More" button (symbol: three dots) or the group name to access further options for the group chat:
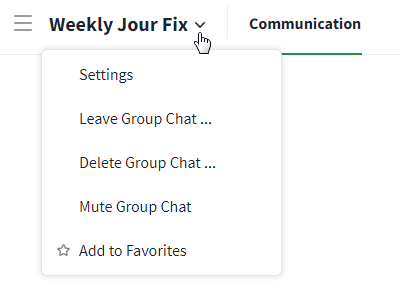
Further group chat options
- Leave Group Chat: by clicking the corresponding button in the drop-down menu, participants can leave the "Leave group chat...". A group admin can only leave an existing group chat if at least one other group admin is in the group chat.
- Delete Group Chat: via the corresponding button in the drop-down menu, a group admin can delete the "Group chat...". The action must be confirmed by typing the word "OK". This option is not available to group chat members in the Participant role.
- Mute Group Chat: A participant can "Mute group chat" via the corresponding button in the drop-down menu. No more push notifications outside of Stackfield are sent. Only the red message in the sidebar remains.
Additional settings for group chats
Note: Only a "group admin" can change the settings of the group chat!
Group chats have, similar to rooms, advanced Settings that can be accessed by clicking on the group name or the "More" button (symbol: three dots). In the settings there are two tabs: General and Members.
General
Here you can change the name of the group chat, add an optional description and view the group chat password. The latter only exists if the group chat was created with end-to-end encryption and fulfills the same purpose as the room password for rooms with activated end-to-end encryption.
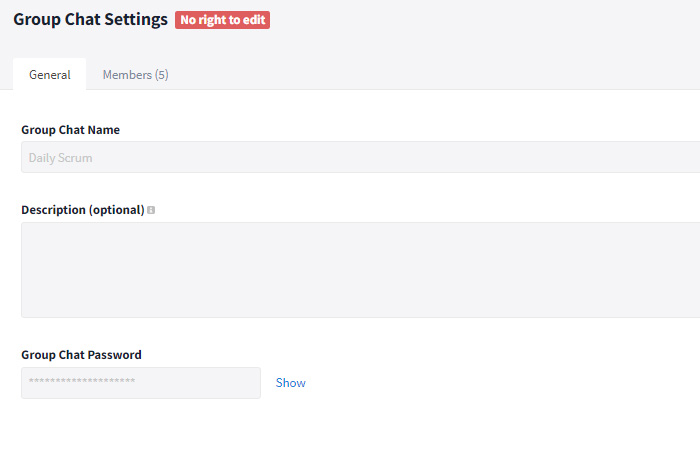
General: Change the group name and add a description
Members
This is where the group chat participants are managed. In the overview you can ...
- Add users / teams to the chat ("Add member").
- Remove users / teams from the chat ("Remove").
- Give users / teams more or fewer rights.
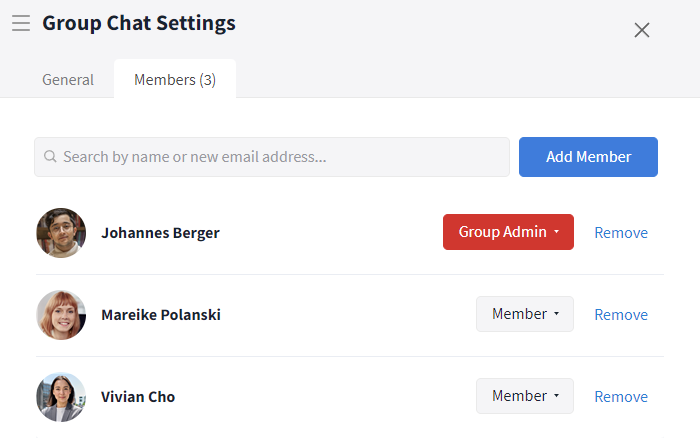
Members: Add new members and manage existing members
Note: You can also add new members directly in group chat: Click on the participant listing in the upper right corner of the view and select "+ Add User".
Further functions
Options for Admins
At organisational level
Activate/deactivate the Direct Messages: The entire range of "Direct Messages" can be deactivated at the organization level for all members of the organization. This may be necessary if another chat tool is already specified company-wide. The option can be found in the organization settings, in the Permissions tab, under "Who can use Direct Messages?". To deactivate it, select "Nobody". To reactivate the area, select "Admins & Members".
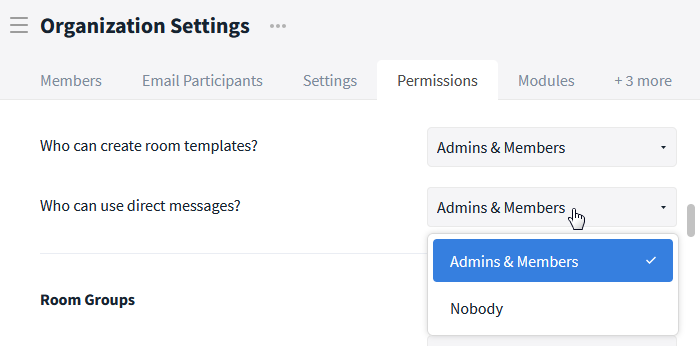
Open the organization settings and the Permissions tab to define who can use direct messages.
Note: Conversations that have already been started / are running are not directly affected by a change to this option and can be continued.
Activate/deactivate the Files Module: The Files Module in the Direct Messages can only be deactivated and reactivated together with the Files Module of all other rooms on a global level. An organization admin can set this option in the organization settings on the Modules tab. Here, all modules can be switched off and on by a slider.
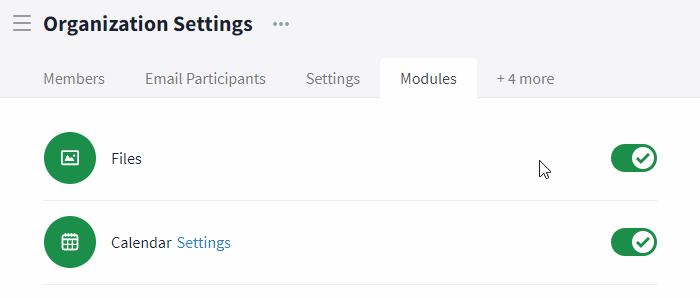
Open the organization settings and the Modules tab to (de)activate the Files module.
Availability by role: The availability of Direct Messages may be limited depending on the user role within the organization. The "Direct Messages" function is not available to a user with the role External. A user with the role Guest can use the Direct Messages function if it was initiated by a member. The role of a member can be changed in the member administration (accessible by clicking on the profile picture in the lower left corner of the sidebar).
Optional end-to-end encryption of direct messages: Whether a chat is created with activated end-to-end encryption is determined by the organization admin. The option for this is located in the organization settings in the Permissions tab under "End-to-end encryption". By default, the option "Always disabled" is set here. If you want to end-to-end encrypt chats, you have to select "Always enabled".
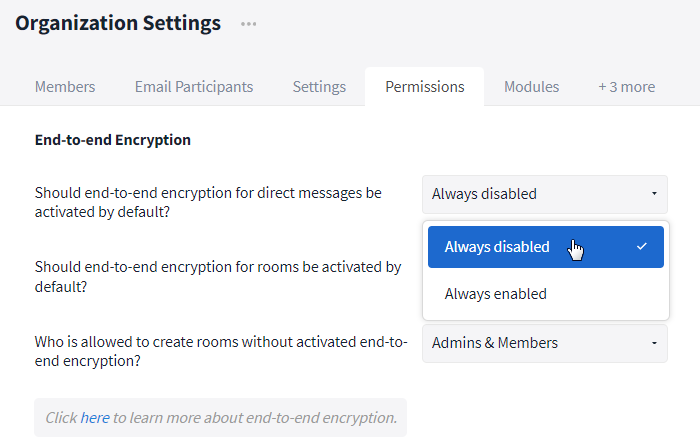
Specify whether direct messages should be end-to-end encrypted
Editing/deleting: Depending on the settings, users can only edit / delete their own content in the chat. The messages of other users cannot be changed or removed.
Only a group admin can change the settings of the group chat or delete it completely.