The project details are a project-related planning overview in which all relevant information on the progress of the respective project is displayed. The project details are available for the room type "Project". Changes to the project details can only be made by (the) project manager(s).
Where can I find the project details?
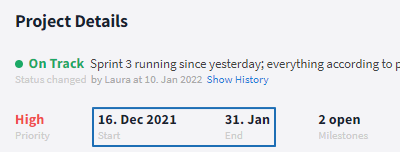
To open the project details of your project room, click on the project status in the top left-hand corner of the room bar next to the room name.
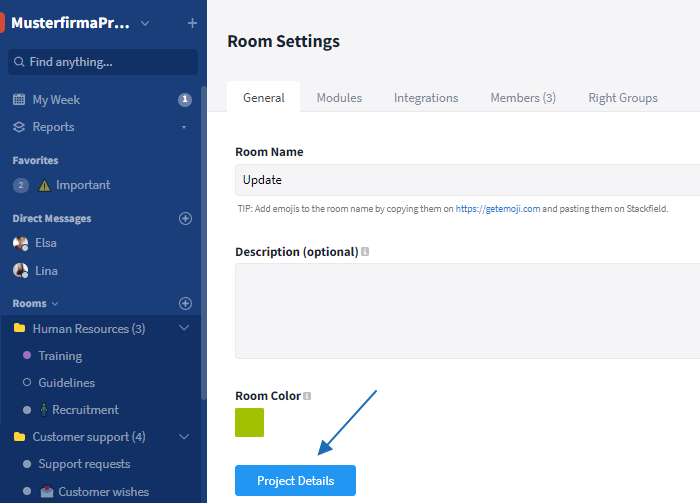
Access project details via project status
Alternatively, click on the room name at the top left, select the option "Room Settings" and click on the "Project Details" button at the bottom of the tab General to open the project planning overview.
Access project details via room settings
Only members of the respective room with the roles Admin / Member / Guest can access the project details via the room. From the Premium plan upwards, the project details can additionally be accessed via the project portfolios by all members of the project room (also by users with the role External) and by observers.
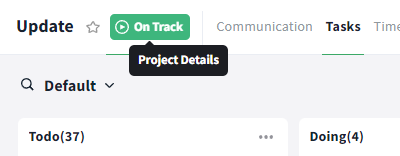
User roles in the project: Observer / Member / Manager
People who are added to a room are Members of the room and can view and edit the entries depending on their right group. However, they can only view the project details, not edit them. Members can be granted additional admin rights to allow them to access the room settings and edit the project details.
A Room Admin is automatically set up as the Project Manager for the project. Project managers have access to all room settings and can also edit the project details. Multiple project managers can be added.
Users who should only have access to the project details (but not to all project content) can be stored as Observers in the project details. The following information is denied in this case:
- Contents of entries (such as tasks)
- All members of the room
- Modules in the room
- Room settings
Observers can be added in the project details above the timeline, directly next to the project manager. All stored users can then access the project details via the project portfolios.
Project managers and observers in the project details
You can see who is observer / manager of a project in the project details (or via the columns in the project portfolios). Additional details about the person can be displayed by clicking on the respective profile picture.
Note: The Observer feature is only available from the Premium plan upwards. The other roles can be used in all plans.
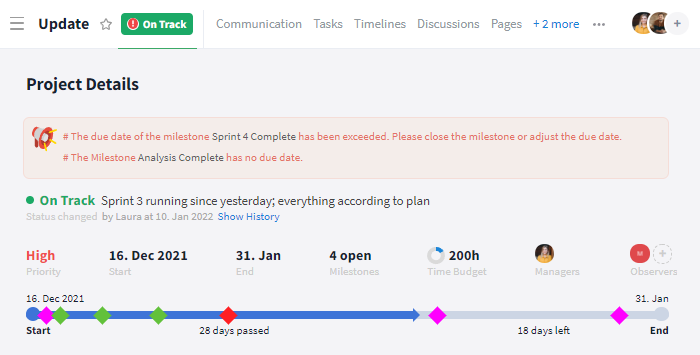
Project status
The project manager can assign one of five statuses to the project. This allows the progress of the project to be categorized at a glance.
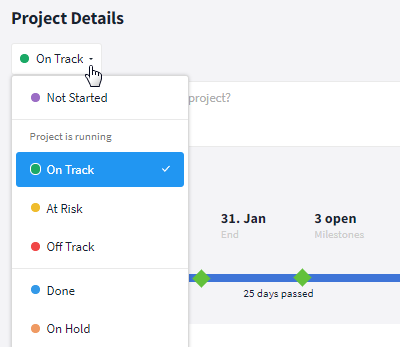
Status options
As soon as the status of the project is changed, a description field opens below it, which must be filled in. Information on the progress of the project can be entered here to explain why the status was changed. The status description (once created) is displayed next to the current status.
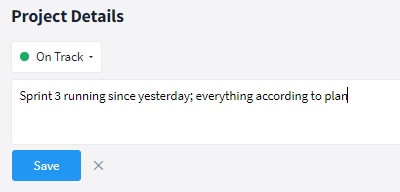
Status description
Below the status, the person who changed the status and the date on which it was changed is noted. By clicking on "Show history", you as a project manager will receive an overview of all status updates. The status history can only be viewed by project managers, for all other people only the current status can be viewed.
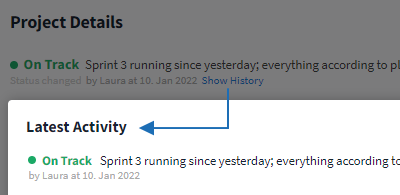
Overview of all status updates
Visibility of the project status: The status can not only be viewed in the project details, but it is also visible in the project portfolios and in the sidebar.
Your project room is displayed in the sidebar and the navigation bar in the opened room with a colored circle / label. The color varies depending on the status of the project, e.g. green for On Track.
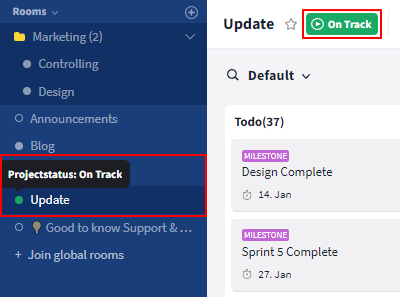
The color of the circle / label represents the project status
Notes on your project
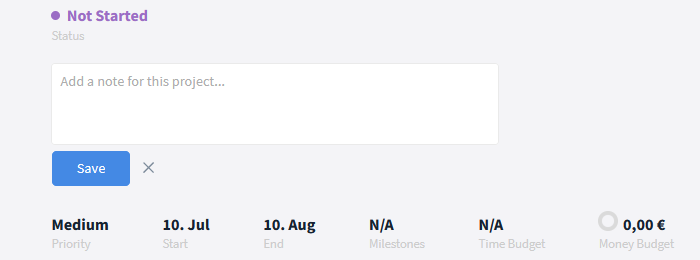
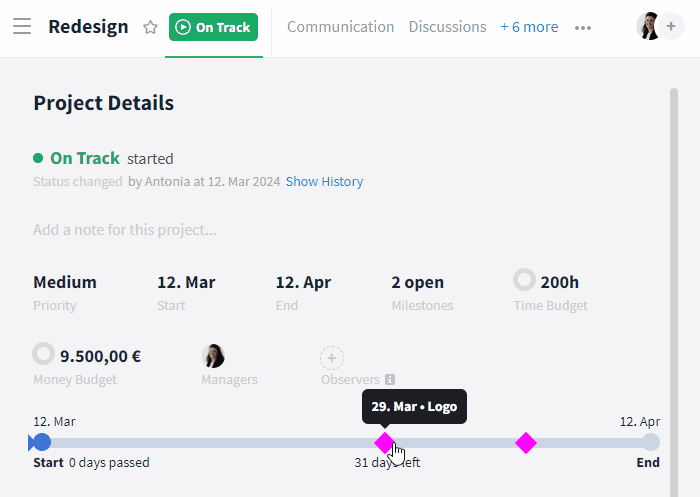
The note field can be used to enter further details. It is located between the status and the other project details such as the priority and can be opened by clicking the light gray text "Add a note for this project...".
Add details in the notes input field
Tip: In the project portfolios, you can include the notes (via the filter option: Note) and the room description (via the filter option: Description) as a column.
Priority
If several projects are being carried out at the same time, it can be helpful to prioritize projects. The following project priorities can therefore be assigned in Stackfield: "Low" (gray font) / "Medium" (black font) / "High" (red font). In the project portfolios, the priority can be displayed as a separate column and you can filter and group by priority.

Project priorities
Start and end date / Project timeline incl. milestones
The start and end dates are set when the room is created, however, they can be changed afterwards in the project details if required.
Start and end date
Directly below you will find a project timeline. The timeline visualizes the progress of the project, i. e. how many days have passed since the start of the project and how many days are left until the end of the project. If the project is overdue, this period is also recorded to the day.

View project progress on the timeline
All project milestones are displayed as diamonds in the project timeline. The exact dating of the milestones can be displayed via mouseover. The color of the milestones is determined by their status:
- Green: Completed
- Red: Overdue
- Pink: Without or with a future due date
The note "x open" above Milestones provides you with information on how many of your milestones defined for the project have not yet been completed (overdue or without a due date). In our example, four milestones are outstanding (pink + red diamonds). To display a list of all milestones in the project including status (color) and due date, click on the note. By clicking on the corresponding milestone in the list, authorized members can open its task card.
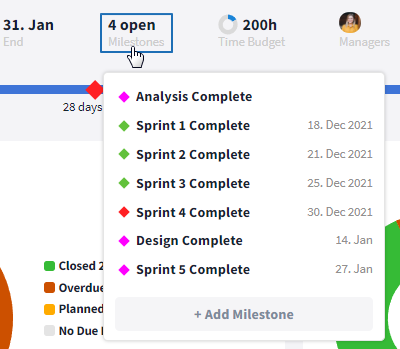
Open milestones
There are also extra notes in the event of deviations.
Open milestones
Dependencies
You can define dependencies between projects in the project portfolios. Double-click on the bar to open the project details. The dependencies set are displayed here, among other things.
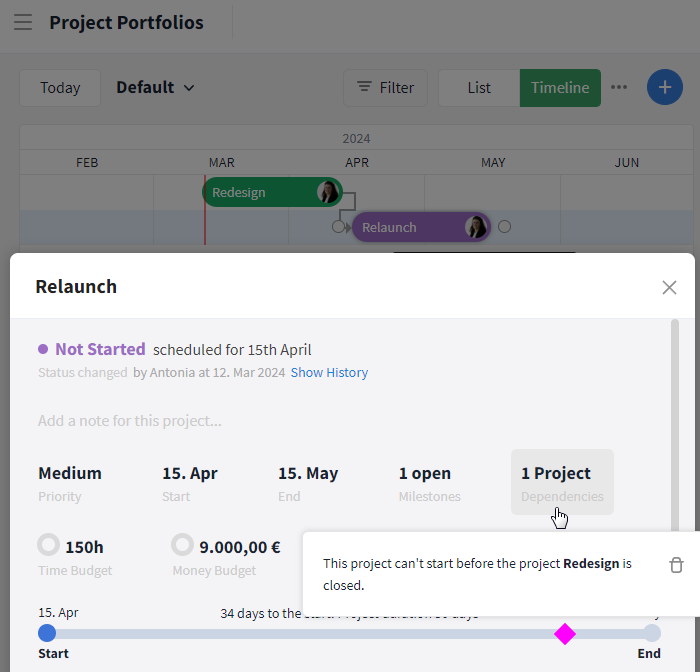
Dependencies between projects
In the example, you can see the Redesign and Relaunch projects in the project portfolios. The dependency set specifies that the Relaunch project can only be started once the Redesign project has been completed. This dependency can also be seen in the project details (here for the Relaunch project).
Tasks: Graphics to visualize processing statuses
The following diagrams will help you to better interpret the remaining workload in terms of project progress. This makes it easier to tell how well your project team is progressing with the tasks, how likely it is that the project can be completed on time, and whether the project plan may still need to be adjusted. Tasks marked as milestones are displayed in the timeline.
Breakdown by processing status
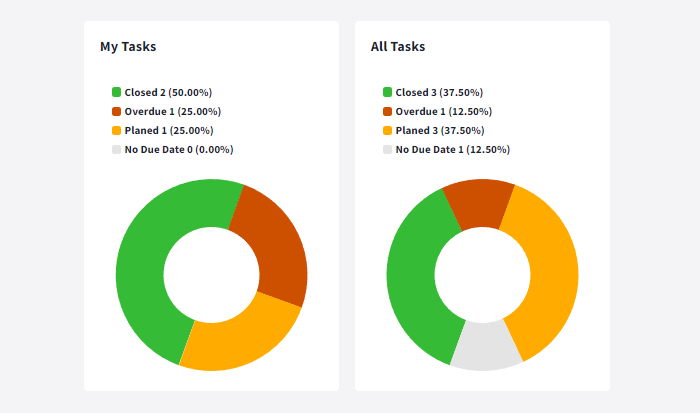
The pie chart provides you with information about the processing status of the tasks created in the project (absolute and percentage).
The "My tasks" section provides you with information about the processing status of all tasks assigned to you. Similarly, the pie chart in the "All tasks" section informs you about the processing status of all tasks created, regardless of whether they have been assigned or not and to whom the task has been assigned.
Graphical breakdown of tasks by processing status
- Completed = tasks with the default status "Completed"
- Overdue = Tasks with a due date that has already started (today or in the past, for time periods based on the start date)
- Planned = tasks with a future due date
- Without due date = tasks for which no completion date has yet been set
Changes in the number of open tasks
The bar chart with a time axis shows how the number of open tasks has changed over the last 25 days. If the bar decreases, the workload to be completed is less, and more tasks have been completed than new ones created.
Which tasks still need to be completed, their processing status, and other details can be viewed in the tasks module.
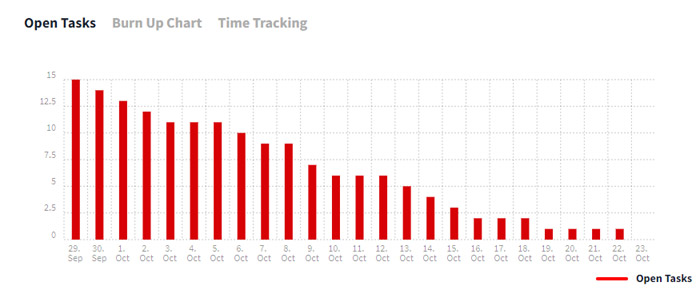
Open tasks over time
Relation of completed / open tasks
The "Burn Up Chart" line chart shows all completed tasks in relation to the project backlog (the total of all tasks within the project) for the last 25 days. In other words, how much work has already been completed, and how much is still planned or pending at the current time. Ideally, the graph of completed tasks should match that of the backlog within the project period.
Further information can be accessed in the tasks module.
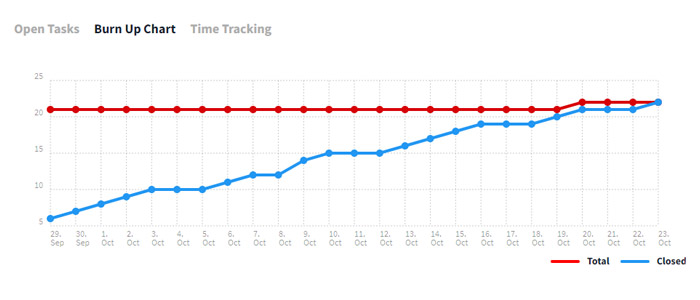
Burn Up Chart
Time budget and time tracking
Overview
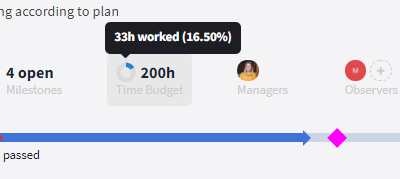
A time budget (number of hours/minutes) can be stored for the project to keep a better overview of the planned and actual time required. This allows you to define how much working time should be planned for the project. By clicking on the time budget, you can adjust the budget at any time.
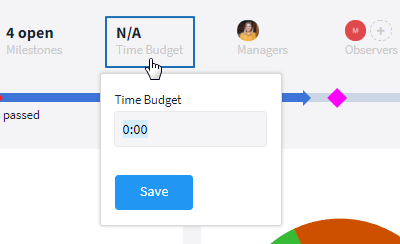
Add a time budget
Once the project manager has entered a time budget and enabled time tracking in the room, a circle appears next to the time budget displaying the time budget in relation to the time spent*. The exact figures, absolute and percentage, can be viewed via mouseover. The predefined time budget is 100%. If, for example, twice as much time is spent on the project as planned, the time budget used will be displayed as 200%.
*A distinction is made between several colors:
- gray circle (no time tracking enabled)
- gray circle with blue share (still on time budget)
- gray circle with yellow share(at least 90% of the time budget has been exhausted)
- red circle (budget exhausted)
Exhausted time budget, still on budget
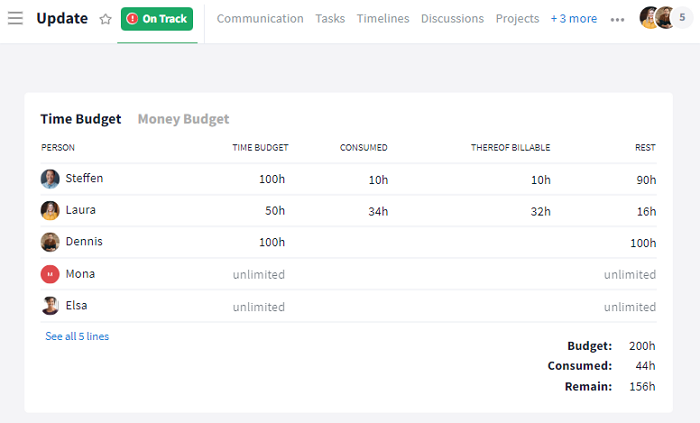
Composition: Who contributed how much?
A list of all the people involved in the project is displayed further down in the project details. In the "Time Budget" column, the project manager can enter a separate time contingent for each person. The other columns show how much time has already been spent, how many hours are billable, and how much time is still left.
At the bottom right you can see the total time budget for all people, how much of it has already been used, and how much is still available.
If no time budget has been entered for a person or if a zero is entered, the budget is displayed as "Unlimited".
Time budget view
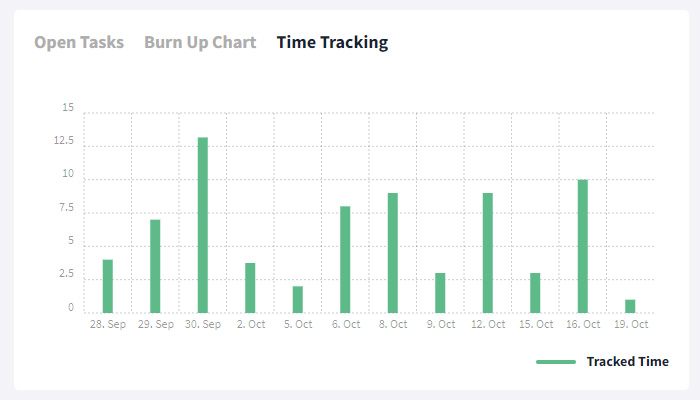
Were times tracked in the last few days and if so, how much?
Diagrams with a timeline provide an insight into what has happened recently. The bar chart in the "Time tracking" area shows the total time tracked per day within the last 25 days of the project period. Further details / a complete overview can be viewed for each task individually or in the reports in the tasks or time tracking module.
Project time tracking
Money budget and cost tracking
Overview
In addition to the time budget, you can also set a money budget for your project, define how much money is planned for its realization, and select the desired currency via the drop-down menu. The budget and currency can be changed at any time.
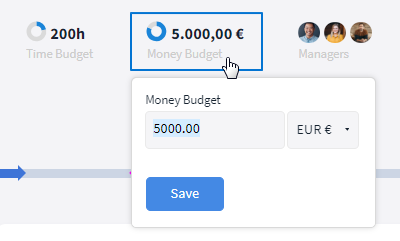
Store a money budget
If a money budget has been entered, a circle appears next to it, displaying the money budget in relation to the used money budget / recorded costs*. You can view the exact figure with a mouseover. If you have not defined a money budget, "n.a." (not available) appears.
*A distinction is made between several colors:
- gray circle (no money budget defined/used)
- gray circle with blue share (still in the money budget)
- gray circle ring with yellow share (at least 90% of the money budget has been exhausted)
- Red circle (budget exhausted)

Money budget exceeded
Composition: Who / what contributed how much?
Further down in the details in the money budget tab, the costs, e. g. for working time, procurement, or production for the project, can be tracked and viewed.
The total amount available, how much of it has already been used, and what is still left is displayed at the bottom right.
Money budget view
Personnel costs
If time tracking is activated in the room, the hourly rate can be automatically offset against the actual work performed based on the billable hours tracked.
For this purpose, all employees involved in the project as well as their hourly rate, billable hours, and the total amount per person are displayed in a list. The standard hourly rate is set to €100.00, the project manager can change the rate for all project participants by clicking on "Change" or adjust it for each user by clicking on the respective amount.
If you would like more details on the tracked times, use the time tracking module in the room/report.
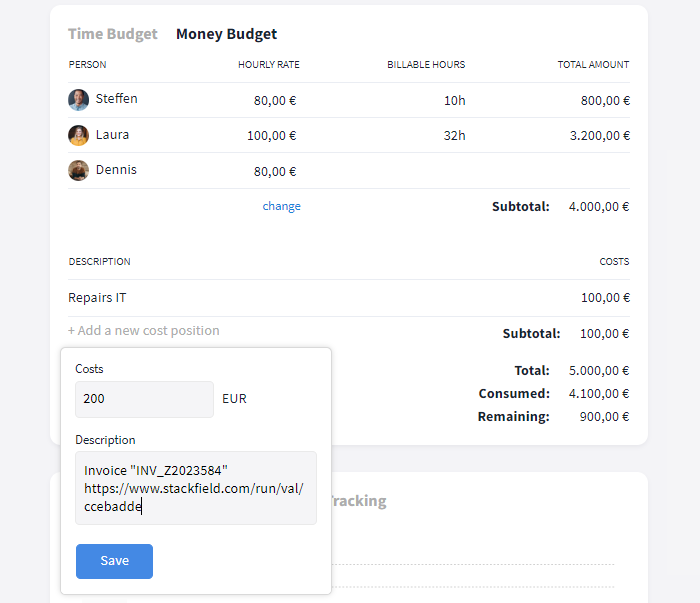
Additional cost items can be added manually to the list in the project details if required.
Other costs
If other costs are incurred for the project, such as capital, material, equipment, or other personnel costs, these can be entered with a description using the "+ Add new cost item" button.
Tip: Store the corresponding proofs / invoices in Stackfield and add the name or link of the entry (e.g. the file / task) in the description of the cost item. If required, you can then see how the costs were calculated and whether everything has already been taken into account. Sub-tasks within a task can help with structuring.
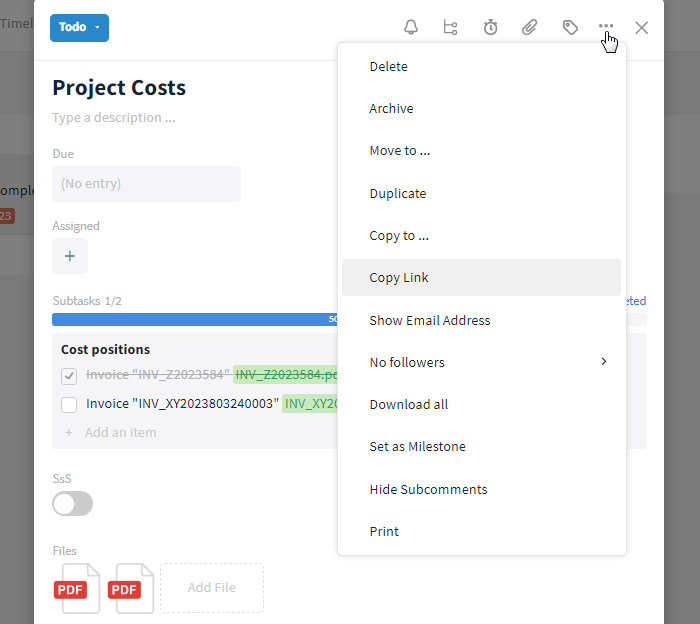
Other costs documented in a task
How am I informed about critical deviations?
During a project, there may be challenges that can delay or even prevent the success / progress / schedule of the project and must therefore be recognized at an early stage. For this reason, some (missing) actions in project rooms trigger automated alerts on Stackfield.
Stackfield raises the alarm if the following cases occur:
- The project has been manually assigned the status "At Risk" or "Off Track".
- The project start date has been reached, but the project still holds the status "Not Started".
- The project status has not been updated for more than 7 days.
- The time frame set for the project has been exceeded.
- The defined time budget / money budget has been exhausted.
- Milestones without a due date have been defined.
- One or more milestones have exceeded their due date (based on their start date), have not yet been completed (default status "Done") and / or are outside the defined project time frame.
Alerts in the header area of the project details and in the status label of the project room
Next, the following automated alerts are activated:
- A red exclamation mark appears in the status label at the top left of the open room.
- The room icon (filled circle) in the sidebar changes its color to red.
- A red exclamation mark is displayed next to the project in the project portfolios.
- All alerts are displayed in the header area of the project details.
If warnings occur in your project, check the current status of the project and make adjustments if necessary, e. g. correct the project scope.
Tip: As a project manager, you can open affected milestones by clicking on their name in the alert in the header area of the project details (without a long search) and, if necessary, adjust their status / due date directly to make the alert disappear again.
More information on project entries / all projects
If you are interested in activities from the project (e. g. the tracked times or tasks), open the corresponding room or report, click on the respective module and open the desired view or the desired entries.
You can also use the reports to get a cross-room overview of all / selected projects.
If you would like an overview / summary of all your projects, use the project portfolios.