The respective view in the Room / the Reports can be modified and saved according to your own requirements using the filter and display options.
This is, for example, the basis for a better overview, for Export / Print, for Subscribing to a calendar or for favoring (the latter option is only possible in the reports).
Additionally, the thread within the communication module can be filtered according to module elements, such as discussions.
Display options
Note: This function is available in the task, timelines, pages, whiteboard as well as the calendar module.
The display can be changed in the tasks and pages module using the buttons
Cards / List. In the timelines and calendar module, this is possible via the buttons
Week / Month / Year or
Week / Month. In the different display variants, entries can be edited by drag and drop and right-clicking / left-clicking / double-click, depending on module.
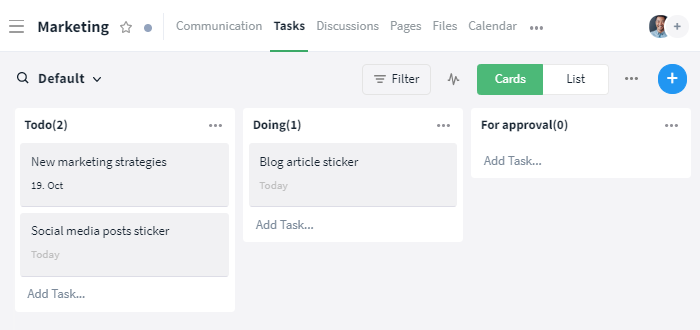
Elements in the module can be displayed in different views
If the list view is activated, it is additionally possible to show or hide columns. Click on MORE in the upper right corner and select the required columns. Columns with checkmarks are displayed, columns without checkmarks are not displayed. The order in the selection menu can be changed by drag and drop.
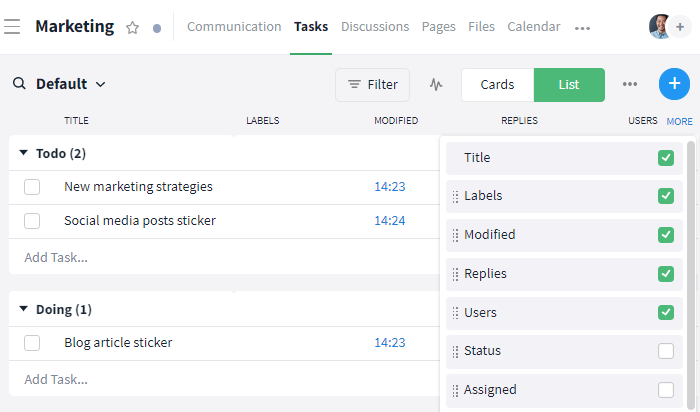
Click on "MORE" to edit the columns
In the tasks module custom fields can also be displayed as a column in the list view.
Filter options
Options for self-defined views
Depending on the module, different options are available. If you have a large selection, you have to make more options visible by clicking on Show more options.
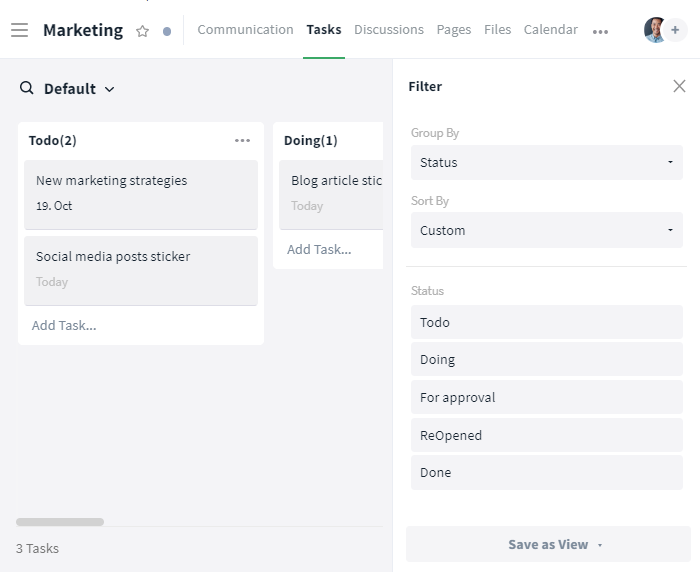
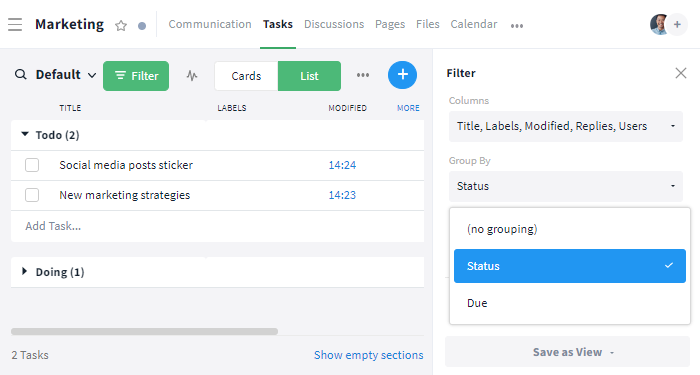
Group by
Note: This function is available for all modules except the calendar, the pages and the whiteboards module.
Depending on the module, the option Group by can be used to group the entries into columns (cards view) or blocks (list view) according to various criteria. In the case of the tasks module, for example, grouping stands for the naming and division of status or due date.
Group entries into blocks using the "Group by" filter
In the list view, the groups can be expanded/collapsed using the "down arrow" button to the left of the selected option. The number of entries in each block is listed in brackets next to the title, the number of expanded entries is listed in the lower-left corner.
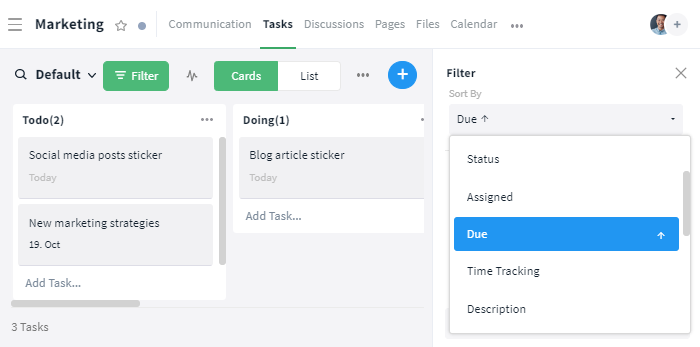
Sort by
Note: This function is available for all modules except communication and the calendar module.
The function Sort by determines the order of the displayed elements. There is a wide range of options available. An "arrow" symbol next to the respective option indicates whether the entries are sorted in ascending or descending order. By default, the arrow points upwards. If the order is to be reversed, the same selection must be made again. Then the arrow points downwards.
Sort elements using the "Sort by"-filter
With the selection Custom* the sorting of the entries can be defined individually by drag and drop. When sorting by Title, the elements are sorted alphabetically. If a numerical order is desired, numbers (01; 02; 03;..) must be placed at the beginning of the title.
*Note: The option Custom is the same for all users of the room and all filters / views. This means that changes in the sorting order are applied to all existing views sorted by Custom.
Milestones
The parameter Milestones can be used to only show / hide tasks marked as milestones.
Status
Note: This function is available for the discussion, tasks, timelines, whiteboards and pages module.
By filtering by Status you can define that only elements with the selected status are displayed.
Assigned
Note: This function is available for the tasks, timelines, and calendar module.
The Assigned parameter can be used to display tasks / events that
- exist in a room (click on "All Members", standard view),
- are assigned / have attendees (click on "All assigned"*),
- don't have any assignments / attendees (click on "Not assigned"),
- are assigned to you / carry you as an attendee (click on "Me"**),
- are assigned to certain members of the room / carry certain attendees (click on the respective name(s) of the members) or
- assigned to members of a certain team / carry members of a certain team as attendees (click on the required team within the section Teams.
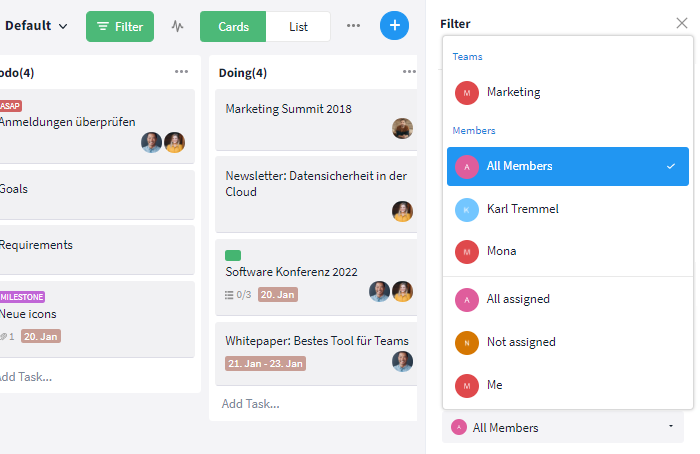
Options with the "Assigned" filter
Notes:
*If the answer is still pending for events, the person will still be considered an attendee and thus assigned. Whereas a rejected event is no longer assigned to the person.
**The option "Me" refers to the user who is viewing the filter at the moment. This does not necessarily have to be the creator of the view.
Due
Note: This function is only available for tasks.
With the filter Due, it is possible to filter by tasks with a certain due date. You can either choose from predefined options (e.g. Today, Tomorrow,..) or select your own period under Date. You can also filter by tasks without a due date.
Labels
See: Working with labels
The parameter Labels can be used to only display elements that have been tagged with a specific label.
Created by
Note: This function is available for the discussion, tasks, snippets, pages, whiteboards and files module.
In addition to the already mentioned possibility of filtering by the assigned person, it is also possible to filter by the person who created the entry. You can select a single person (by clicking on the respective name) or any person (by clicking on the option All Members).
Created
Note: This function is available for the discussion, tasks, snippets, pages, whiteboards and files module.
Instead of filtering by the creator you can also filter by creation date.
Modified by
Note: This function is available for the discussion, tasks, snippets, pages, whiteboards and files module.
By using the parameter Modified by only those elements can be displayed which have been edited by a certain person.
Modified
Note: This function is available for the discussion, tasks, snippets, pages, whiteboards and files module.
It is also possible to filter modified elements by today, yesterday, or a long time ago. Depending on the module and its focus, different actions are considered modifications. For example, comments in discussions are perceived as modifications, but comments in tasks, pages, and files are not.
Shared with Externals
Note: This function is available for the discussion, tasks, snippets, pages, whiteboards and files module.
By selecting Shared with Externals you can filter by the entries shared with the role External.
Columns
Note: This function is available for all modules except the calendar module.
It is possible to show or hide columns using the filter. The order of the columns can be adjusted by drag and drop. In the Display of the list view this is possible via MORE.
Year
Note: This function is only available for the timelines module.)
The parameter Year can be used to select the view of another year in the timelines module.
Language
Note: This function is only available for the snippets module.
Required programming languages can be defined in the snippets module via the filter Language.
Types
Note: This function is only available for the files and calendar module.)
The parameter Types restricts types allowed in the module. In the files module, the file types Images, Word, Excel, PowerPoint, PDF, Links and Custom are available. The calendar module distinguishes between the entry types Tasks and Events.
Custom Fields
Subtasks
Note: This function is only available for the tasks module.
You can display open subtasks including due date and assignment via the filter in the list view of the tasks module.
Applying / Removing filters
In rooms, filters and any changes to them are applied immediately. In the reports, these must be applied with the option Apply Filter. However, filters only affect yourself. (See: Make filters accessible to everyone). If a filter is activated, you can recognize it by the green X-symbol that appears on the Filter button, or in the case of the communication module by the "three green bars" next to the module.

Activated filter
In the reports, for selected parameters such as Status, Assigned / Members or Labels, the entire selection can be shown or hidden. To do this, click on the button Show / Hide.
Parameters can be hidden or shown
If filter settings are edited and applied, these changes are applied to the currently selected view, and the name changes to Default.
Notes:
- Default is not a saved view, but only a local (display and) filter setting and can therefore not be subscribed / favored.
- Particularity within the Reports: If you change the names of labels, status or custom fields, the affected views must be saved again (see: Creating / Overriding a view).
To remove the current filter, click the X-symbol, or, in the case of the communication module, the "three green lines" and the option All Activities.
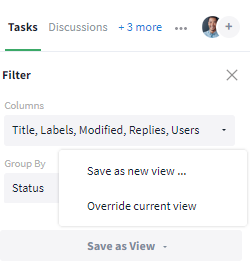
Creating / Overriding a view
After all required filter and display options have been selected, the view can be saved by clicking the Save as View button. There are then two options to choose from: First, the view can be saved as a new view (option Save as new view...), second, an existing view can be overridden (option Override current view).
Save self-defined view
If a view is saved as a Public View, it is available to all users in the room or organization - depending on where the view is saved. Otherwise, the view is only accessible to oneself.
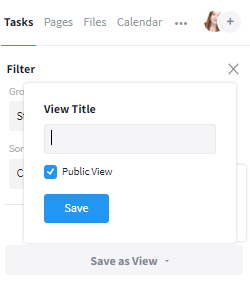
Save new view as "Public View"
Note: For Public Views, only the filter settings are visible. The content itself, such as tasks or events, is only displayed to room members with the appropriate rights.
If a view is overridden, the changes in the filter and/or display options are applied to the current view, the title remains the same. It is not possible to override predefined views. Views can only be overridden if the right for it exists.
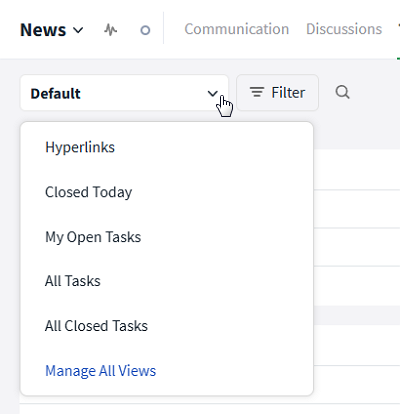
How do I access and change / manage views?
*Note: Views that have been saved in a room can be found in the room within the respective module. Views that have been saved in the reports can be found in the reports within the respective module.
To access and select predefined and self-defined views, click on the title of the current view on the right side of the magnifying glass icon at the desired location*. All views are now listed in the drop-down menu. Click on the desired view to apply it.
Call up pre- and self-defined views
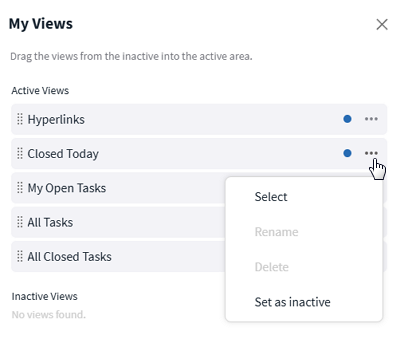
The rights (Rename / Delete / Deactivate / Override) of a view can also be viewed via the drop-down menu. To do so, click on Manage All Views. The authorized person can now be recognized by their profile picture next to the respective view or by the admin role of the respective level. Default views are marked with a blue dot instead.
Manage all Views
To open, rename, delete or deactivate a view (Set as inactive) click on the "More" button (Symbol: Three dots) at the right end of the view.
The order of the views can be changed by drag and drop.