The year 2026 is already a few weeks underway – and a lot has already happened in Stackfield during this time. With this update, we’re introducing several new features designed to give you even more clarity and flexibility in your project work.
At the center of this update is the new "Network Diagram" (PERT) module, which allows you to clearly visualize the logical and chronological structure of your projects. Alongside this, we’re introducing Task IDs, enabling tasks to be uniquely identified. These unique identifiers make working with task cards noticeably easier.
In addition, this update includes several further improvements: a new tree view in the "Files" module provides better organization, subtasks can be converted directly into standalone tasks, and custom fields can be displayed directly on task cards. The update is rounded out by an API extension that allows fields and labels to be set already when tasks are created.
We hope you enjoy exploring the new features and, as always, we look forward to your feedback.
Working with the new Network Diagram module
With the new "Network Diagram" (PERT) module, you can visualize projects in Stackfield graphically. At a glance, you can see which tasks exist, the order in which they need to be completed, how long they are expected to take, and whether your planning might lead to time constraints or bottlenecks.
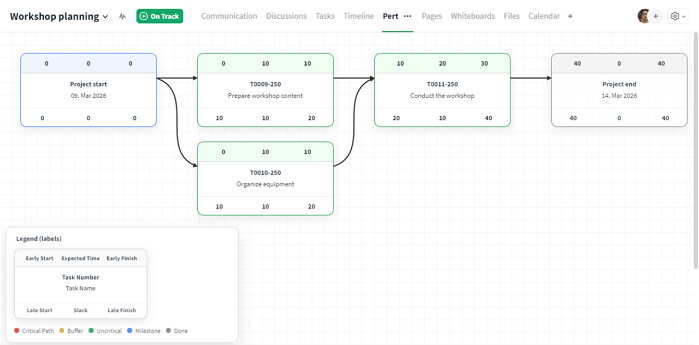
This is what the new "PERT" module looks like using a sample project.
A network diagram helps you to,
- structure project workflows in a clear and transparent way
- quickly identify dependencies between tasks
- understand the overall duration of a project as well as individual tasks
- identify the critical path (tasks that must not be delayed)
How to activate the "PERT" module
You can activate the Network Diagram module either when creating a new project room or add it later to an existing room.
When creating a new project room, simply select the module during setup. To add the module at a later stage, proceed as follows:
- Open the room settings of the desired project room.
- Switch to the "Modules" tab.
- Click the black "PERT" icon. The icon will turn green once activated.
The Network Diagram is now enabled and ready to use. Please note: The Tasks module must be activated for the "PERT" to appear in the module list.
The "Time Tracking" module must also be enabled. With time tracking, you can define and monitor the duration of individual tasks. In the "PERT" module, you can immediately see how much time has already been invested and how much time remains.
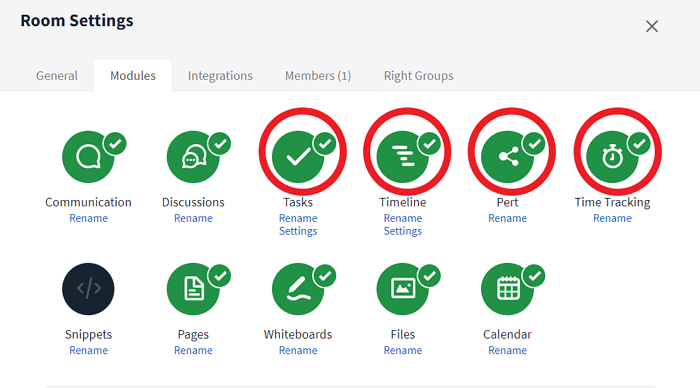
These four modules should be enabled to get the most out of the Network Diagram
Additionally, we recommend enabling the "Timeline" module. In the Timeline, you can define dependencies between tasks in a Gantt chart. These dependencies are automatically transferred to the Network Diagram and displayed there in greater detail.
What do I see in the "PERT" module?
When you open the "PERT" module in a new project room for the first time, the view will initially be empty. This is because a network diagram requires at least two tasks with a dependency between them.
Once tasks and dependencies have been created, the "PERT" module displays individual tasks as so-called "nodes" and visualizes their relationships graphically.
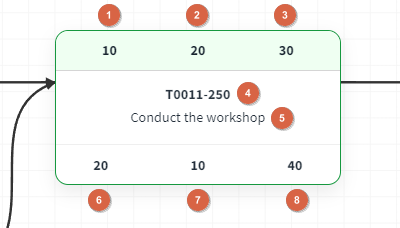
An example of a node in the "PERT" module
Each node contains the following information (a matching glossary is also available directly within the module):
- "Early Start": The earliest point in time (in hours) at which the task can begin
- "Duration": The planned task duration in hours (estimated based on time tracking)
- "Early Finish": The earliest point in time at which the task can be completed
- "Task Number": The unique Task ID of the task
- "Task Name": The name of the task
- "Late Start": The latest possible start time to keep the project schedule on track
- "Slack": The amount of time the task can be delayed without affecting the overall project plan
- "Late Finish": The latest point in time by which the task must be completed
Even more clarity with Task IDs
To make tasks easier to identify, this update introduces Task IDs for task cards. Once enabled in a room, these unique identifiers are displayed both on Kanban cards and within each task.
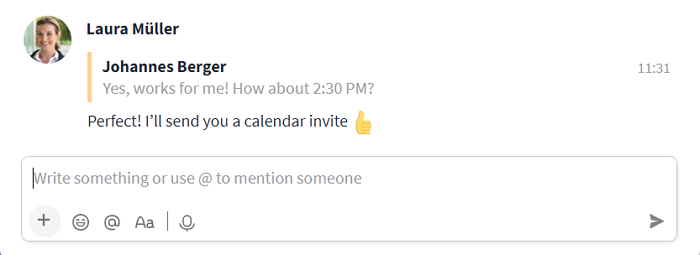
Task IDs can be copied and are automatically recognized as links when pasted. For example, you can simply send a Task ID to a colleague in a direct message. When hovering over the ID, a preview of the task content is shown, and, provided the necessary permissions are in place, the task can be opened, viewed, and edited directly from the chat with a single click.
Of course, tasks can also be searched directly using their Task ID.
How are Task IDs enabled?
Task IDs can be enabled in the room settings. In the "Modules" tab, click "Settings" under the "Tasks" module to find the following two options:
- "Show Task ID in Task dialog header?"
- "Show Task ID in Task Card?"
Clicking the gray "X" next to the respective option activates it. The toggle will then change to a green checkmark.
Task IDs can be enabled in the room settings
Task IDs in the task dialog:
When you activate the option "Show task ID in Task dialog header?", the Task ID will appear in the top-left corner of an open task. Hovering over it reveals a copy icon, allowing you to copy the Task ID with a single click. When pasted elsewhere, it automatically links to the corresponding task.

Task IDs können kopiert werden
Task IDs on Kanban cards:
With the option "Show task ID in Task Card?", the Task ID is displayed directly on task cards in the Kanban board. This makes tasks easier to identify at a glance and allows you to search and filter specifically by Task IDs.
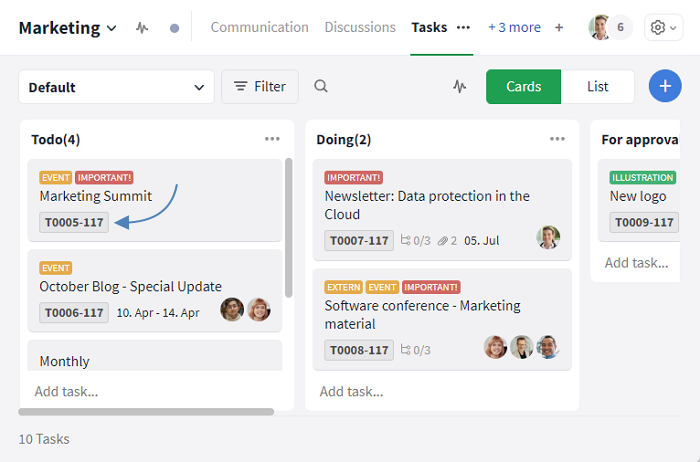
The Task ID is displayed directly on Kanban task cards
The text input field has a new design
With this update, we’ve refreshed the look of the text input field and refined the arrangement of the icons. The result is a cleaner, more modern design and an even more intuitive user experience.
The updated appearance of the text input field
Beyond the visual update, the new structure also lays the foundation for future enhancements. The optimized layout of controls makes it easier to integrate additional features and content going forward.
Without revealing too much, further improvements to the text input field are already in the works. Stay tuned!
A clearer overview of your files with the new tree structure
The "Files" module has been enhanced with an optional tree view. This is especially helpful if you work with multiple nested folders and want to maintain a clear overview at all times.
The tree view can be shown or hidden using the new expand / collapse button. You’ll find it in the "Files" module at the top left, directly next to the search icon.
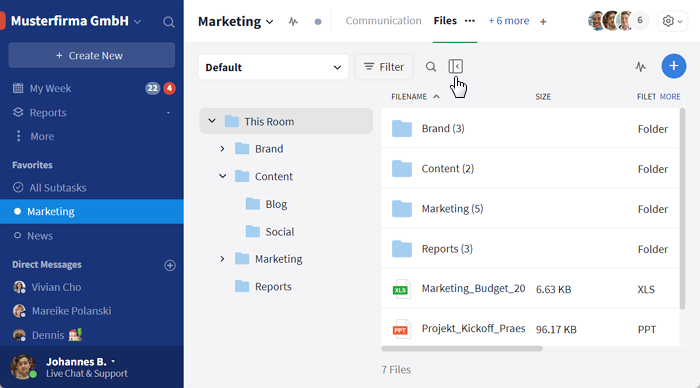
The new tree structure makes the "Files" module even more organized
Once activated, the tree view appears to the left of the regular file overview and displays all folders and subfolders at a glance.
In addition, the "Files" module has been further improved: If a folder containing files is deleted, those files are automatically moved to the so-called "root folder". From there, you can continue to manage, move, or edit them as usual.
Voice messages in comments and the mobile app
Voice messages are no longer limited to direct messages or the "Communication" module. They are now also available in all comments across Stackfield. In addition, you can conveniently record and listen to voice messages using the mobile app for iOS and Android.
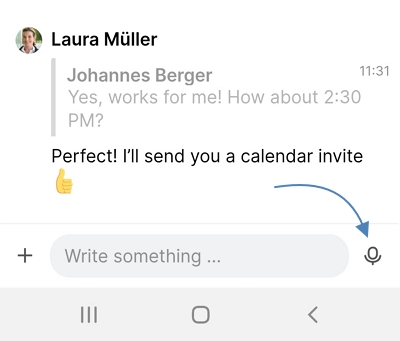
The voice message icon in the mobile app
Converting subtasks into tasks
Subtasks are a useful way to structure tasks and break them down into smaller steps. However, a subtask can sometimes grow into something substantial enough to be managed as a standalone task. With this update, you can now convert subtasks directly into tasks.
To do so, click on the subtask you would like to convert. In the three-dot menu that appears, select "Convert to Task" and confirm your selection.
Turn a subtask into a task
The original subtask is then removed and replaced with a newly created task. The title of the new task corresponds to the content of the original subtask.
In addition, the following information is carried over:
- Description
- Due date
- Reminders
- Assigned users
- Comments
Files are also retained: If files are mentioned or attached within a subtask, they are transferred to the newly created task. The respective document will then be available in both the original task and the newly converted task.
Viewing custom fields directly on task cards
Custom Fields allow you to store additional information directly within tasks – for example, phone numbers, email addresses, or short notes. With this update, you can now display these details directly on task cards in the Kanban board.

Individual custom fields shown on Kanban cards
How to display custom fields on task cards:
- Open the room settings, switch to the "Modules" tab, and click "Settings" under the "Tasks" module.
- Create a new custom field or select an existing one.
- Below the field name, enable the option "Display on Kanban Card". The toggle will change from a gray "X" to a green checkmark.
Once activated, the selected field will be displayed directly on the task cards.
Note: Custom fields are only shown on Kanban cards once they contain a value. The only exception is the "Checkbox" field, as it always represents a defined yes / no state and therefore has a predetermined value.
Time periods at a glance with the new summary bar
Would you like to quickly see over which time span tasks with a specific criterion are scheduled? The new summary bar in the "Timeline" module makes this possible. It displays the total time span of all tasks within a selected grouping, for example by "Status".
How to activate the summary bar
- Open the Filter in the "Timeline" module.
- Under "Group By", select a grouping option, such as "Status".
- Close the filter view.
A summary bar will then automatically appear for the selected grouping.
Enable the summary bar in the "Timeline" module
The length of the bar represents the time span between the earliest due date and the latest due date within the respective group. This allows you to instantly see the overall period covered by the tasks.
API extension: Setting fields and labels directly when creating items
The Stackfield API has been extended: When creating new items via webhooks, custom fields and labels can now be defined directly within the creation request. This allows automated processes and integrations to be managed more precisely, as tasks, discussions, or other items can be fully structured and categorized from the moment they are created.